-->

aws security, mfa, yubikey

Multi-factor authentication (MFA) provides an extra layer of security to your accounts and helps prevent unauthorized access, even if a user’s access key is compromised. It’s fairly straightforward to add MFA to use AWS Management Console, which is highly recommended. It involves a few more steps when using the CLI, which you will see in this tutorial.

When using AWS CLI, developers generally store their IAM keys in plaintext on their computers. In the previous article, we discussed how to rotate AWS access keys. This is a good practice, but anyone with access to those credentials can still impersonate the owner before they are revoked. These keys are generally quite powerful and allow access to critical parts of the system. In this tutorial, you will learn how to add Yubikey support for using AWS CLI so that even if the IAM key is compromised, the hackers can’t use it without access to the physical security token.

Prerequisites

Set up the environment

To test using a Yubikey with AWS CLI, first, you’ll need an IAM user.

Log in to AWS Management Console and go to Identity and Access Management (IAM).

Click Users in the menu and then click the Add Users button.

Enter demo_user as the user name and click Next.

Click Next again on the Permissions page and click Create user on the review page.

After creating your user, click on the user name and switch to the Security credentials tab.

Scroll down to Access keys and click Create access key.

Select Command Line Interface (CLI) for your intended usage, tick the I understand… checkbox at the bottom and click Next.
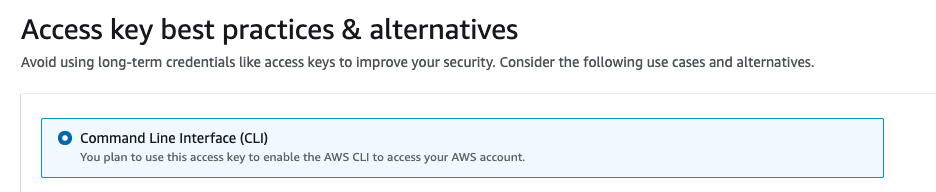
Command Line Interface (CLI) is selected as the intended use for the key

Click Create access key on the next page.

In your AWS credentials file (~/.aws/credentials), copy and paste your access and secret access keys into a new profile with the same name so it looks like this:

Click Done to finish the key creation process.

Open a terminal and run the following command:

aws s3 ls --profile demo_user

You should see Access Denied error as you haven’t granted any permissions to this access key.

Terminal showing Access Denied error while trying to list the buckets

Now, create a role that gives this access to the user.

Click Roles and Create role.

Select Custom trust policy and paste the following policy. Make sure to replace <YOUR ACCOUNT NUMBER> with the actual value.

{
  "Version": "2012-10-17",
  "Statement": [
    {
      "Sid": "Statement1",
      "Effect": "Allow",
      "Principal": { "AWS":"arn:aws:iam::<YOUR ACCOUNT NUMBER>:user/demo_user" },
      "Action": "sts:AssumeRole",
      "Condition": { "Bool": { "aws:MultiFactorAuthPresent": "true" } }
    }
  ]
}

Click Next.

On the Add permissions page, search S3 and tick the checkbox next to the AmazonS3ReadOnlyAccess policy.

Click Next.

Enter s3-read-only-mfa-role as the role name and click Create role.

As you can see in the role policy, there is a condition for the MFA present. In the next section, you will add that to the user.

Add Yubikey to the User

Open the user’s Security Credentials tab and scroll to the Multi-factor authentication (MFA) section.

Click the Assign MFA device button.

On the Select MFA device page, enter yubikey as the device name.

Select the Authenticator app as the device type. This is a bit counter-intuitive as Yubikey is listed as a security key, but you will generate a Time-based one-time password (TOTP) with your Yubikey, so make sure to select this option.
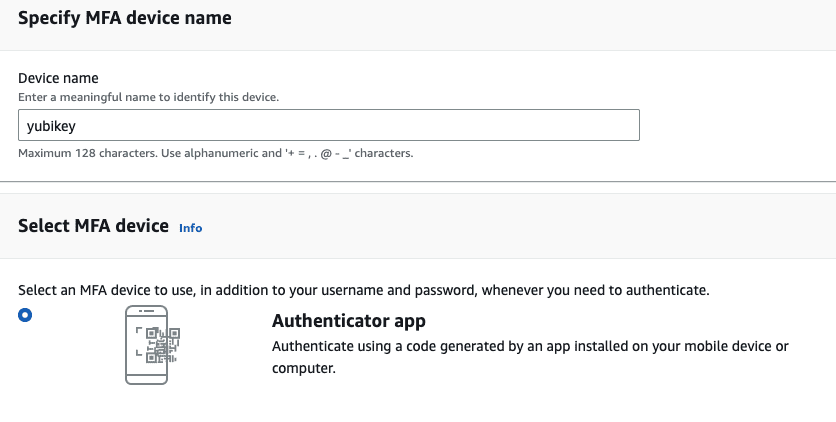
Select MFA device page showing yubikey entered as device name and Authenticator app selected as device type.

Click Next.

On the Set up device page, click the Show secret key link.
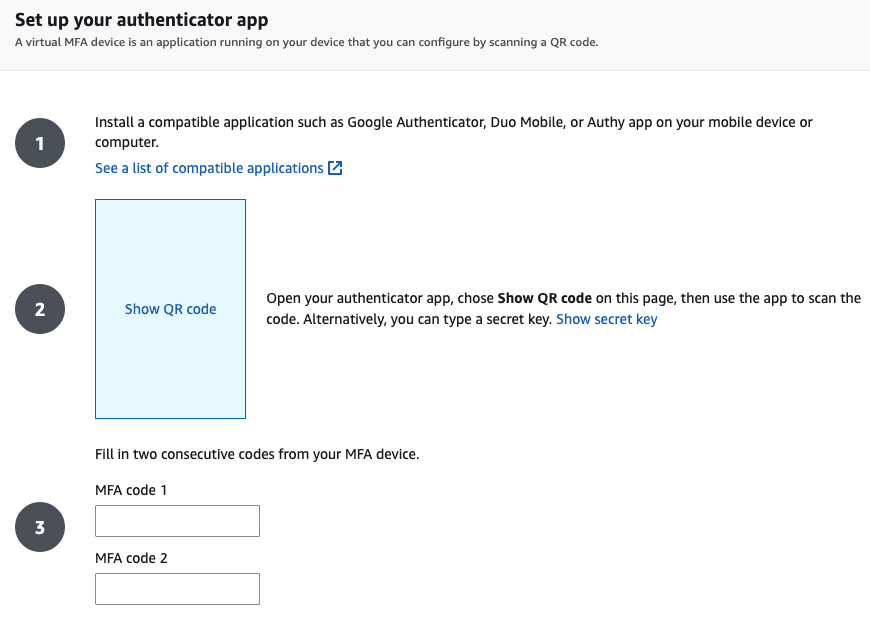
Set up device page showing the Show secret key link

As you will be using the CLI, the QR code will not do it in this case, but the QR code is just a visual representation of the same secret key anyway.

Copy the secret key displayed on your screen and run the following command in a terminal:

ykman oath accounts add -t yubikey { YOUR SECRET KEY }

Make sure to use the -t parameter as it enforces touching the key. It adds extra security as the codes cannot be generated without physical access.

It’s now time to generate 2 time-based codes. So to achieve this, run the following command:

ykman oath accounts code yubikey

Copy the 6-digit integer and paste it into the MFA code 1 field.

Keep running the command above to generate a second code. It may take a few tries as it’s time-based. For example, my attempt looked like this:
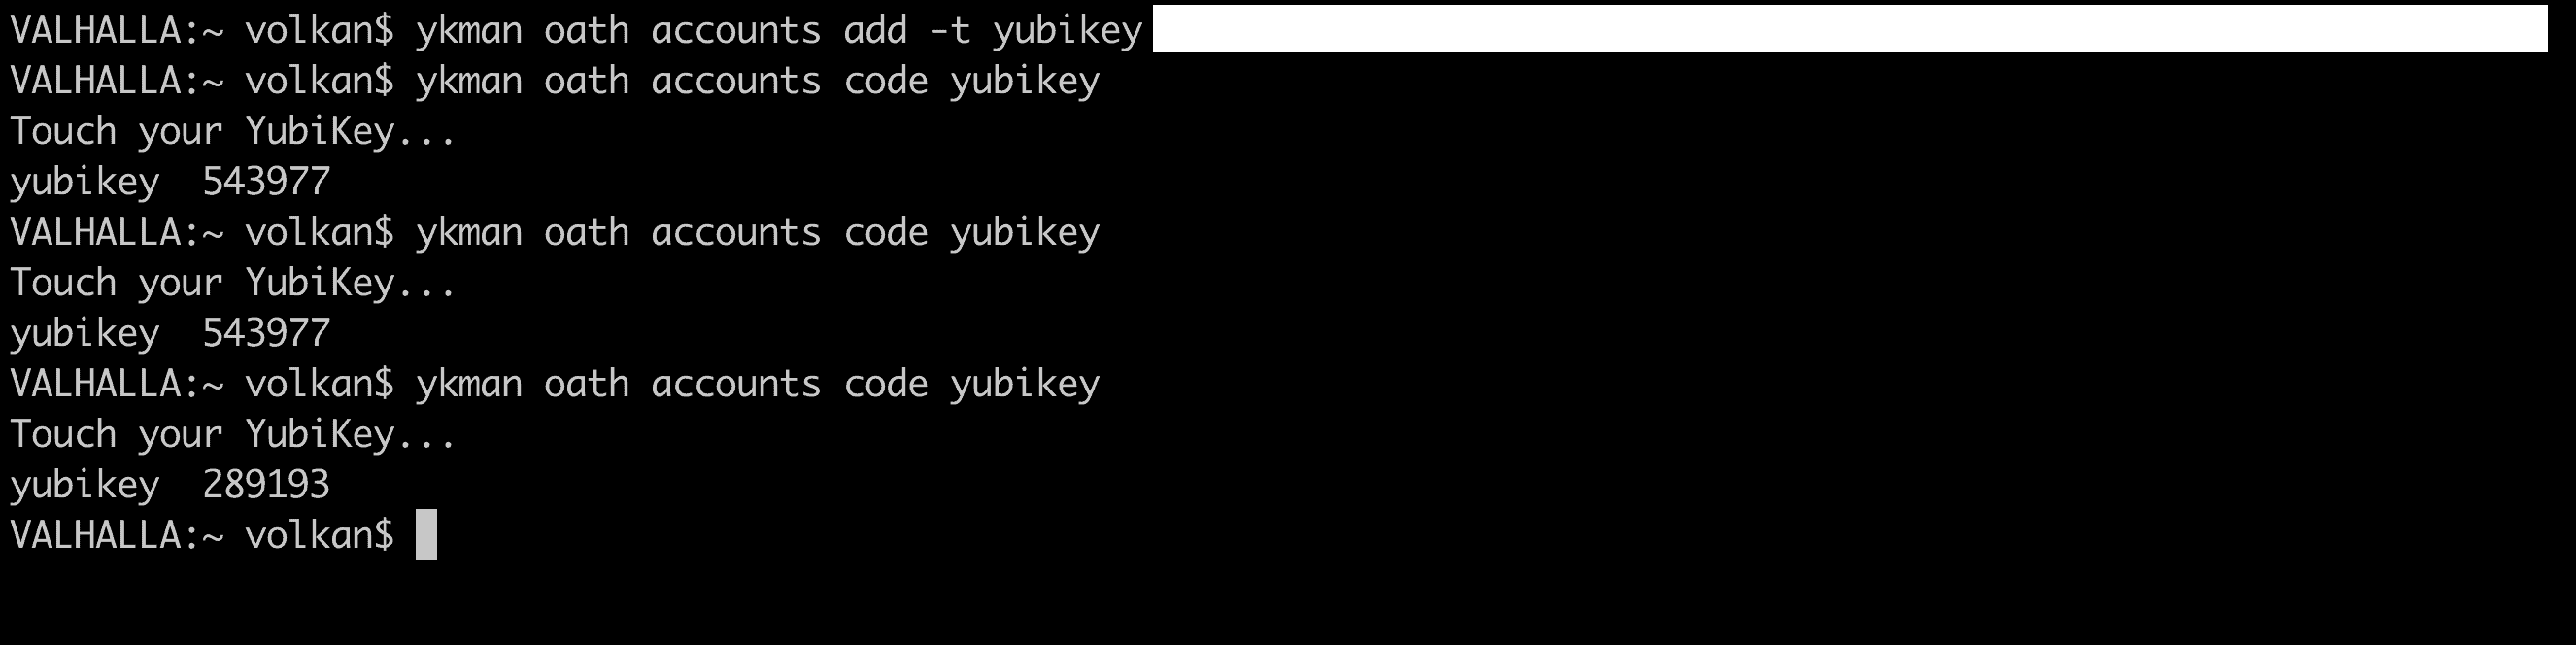
Terminal window showing ykman commands to add the key and generate the codes

Now it’s time to tie them all together. For this, you will need the following to your AWS config file (~/.aws/config):

[profile demo_user]
source_profile = demo_user
mfa_serial = arn:aws:iam::<YOUR ACCOUNT NUMBER>:mfa/yubikey
role_arn = arn:aws:iam::<YOUR ACCOUNT NUMBER>:role/s3-read-only-mfa-role

Make sure to replace <YOUR ACCOUNT NUMBER> with the actual value in both places.

Rerun the same test command to see if it behaves differently:

aws s3 ls --profile demo_user

This time you should see the CLI asking for an MFA code:

Terminal showing AWS CLI asking for an MFA code

Press Ctrl + C to exit this, as you don’t have the code at the moment. To generate the code, run the same command you used while registering the MFA device:

ykman oath accounts code yubikey

Then, rerun the AWS command and copy/paste the 6-digit code generated by Yubikey and press enter. This time you should see the successful results:
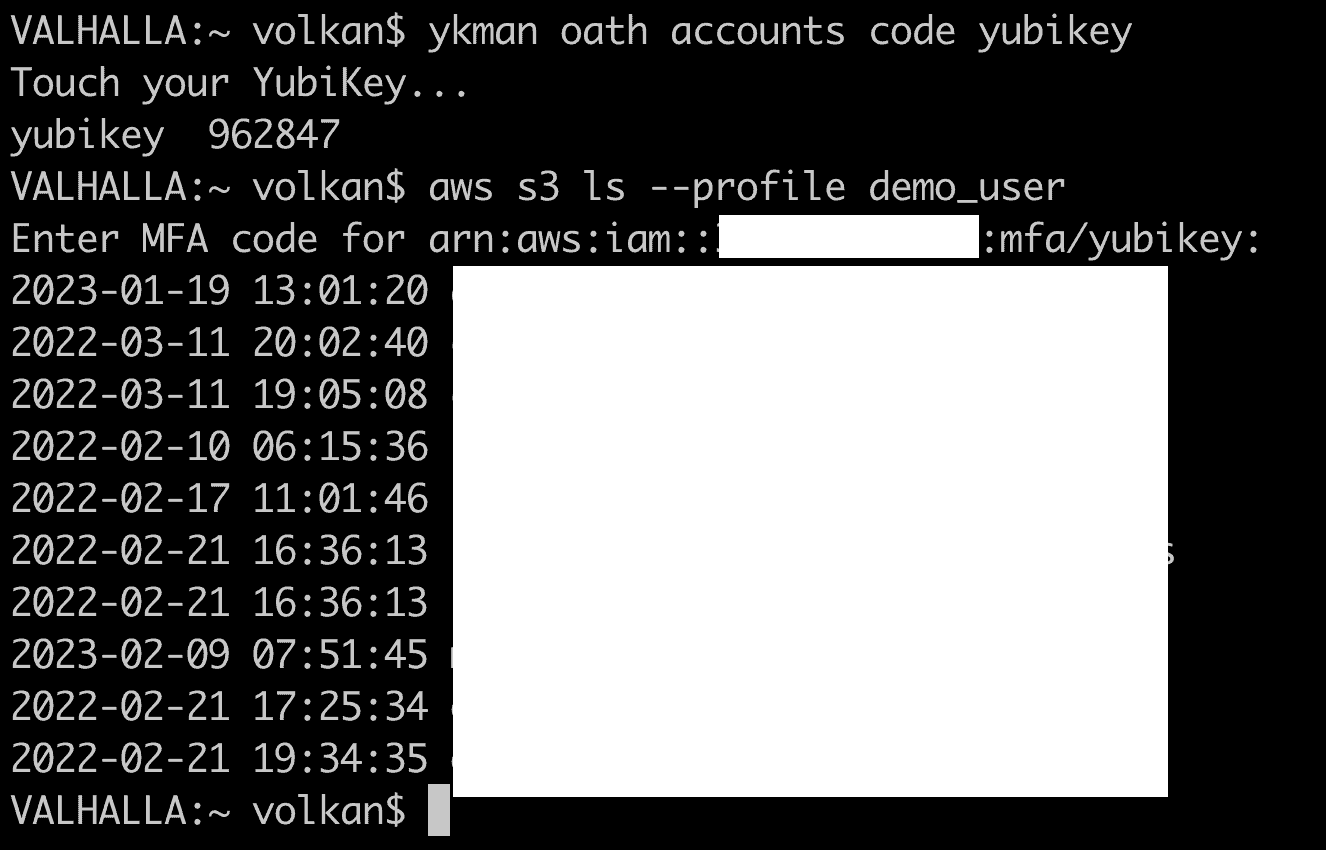
Terminal window showing successful results after MFA code has been entered

By default, the temporary credentials are valid for 1 hour. You can change this value in the role settings by clicking the Edit button in the role summary section.
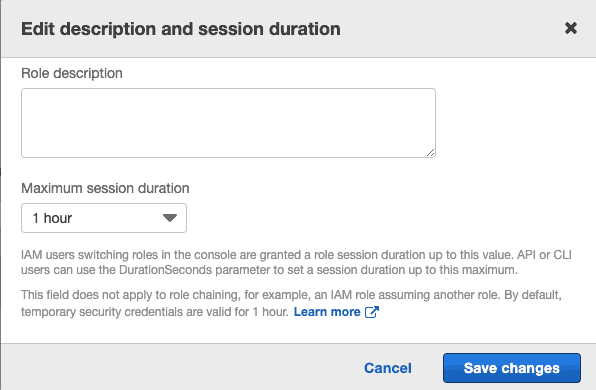
Make sure NOT to choose for a very long time, as the temporary security credentials cannot be revoked.

If you want to double-check that you’re really using these temporary credentials for the role you created, run the following command:

aws sts get-caller-identity --profile demo_user
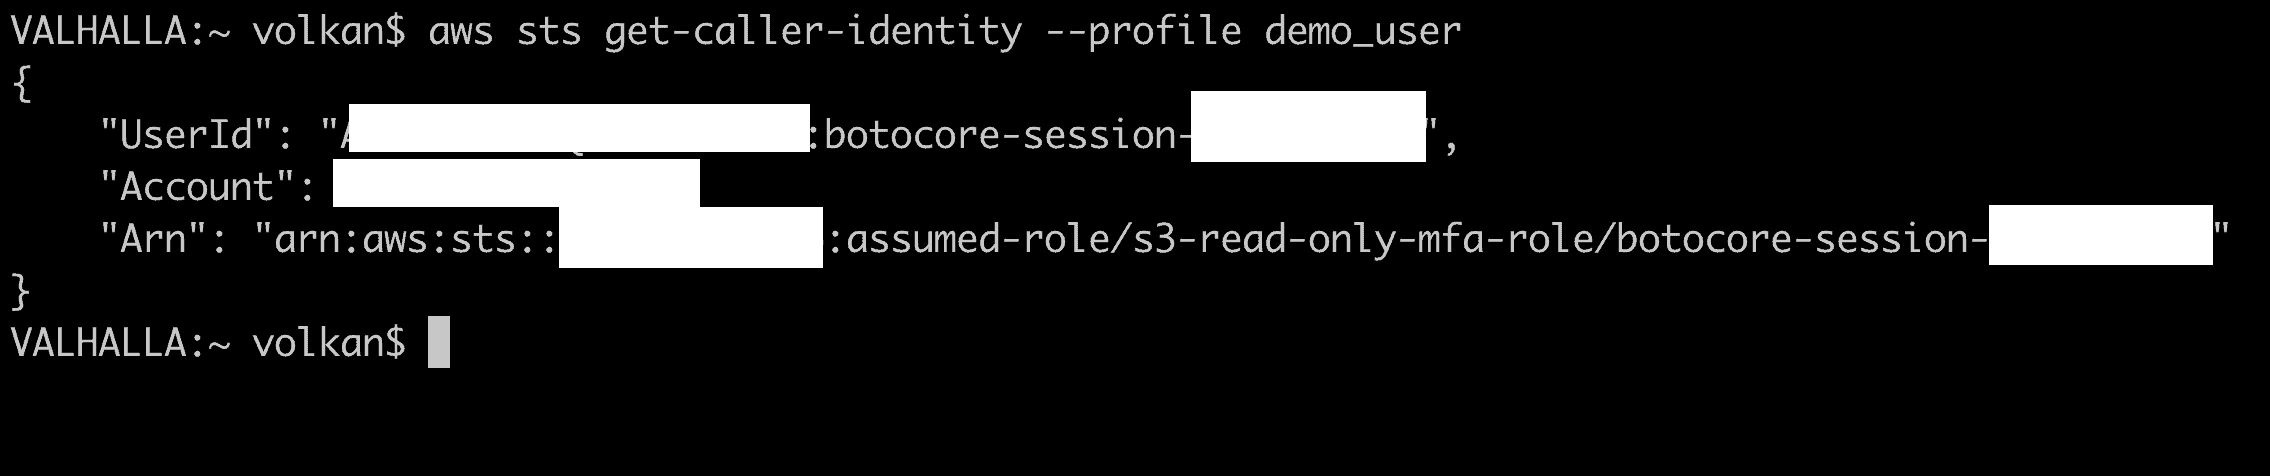
You can see in the Arn field the assumed role is s3-read-only-mfa-role.

To further test, attempt to create a new bucket by running the following command:

aws s3 mb s3://my-demo-bucket-56345765 --region us-east-1 --profile demo_user

You should get an Access Denied error as you only have read-only access to the S3 service.

If you want to revoke the credentials locally, you can delete the AWS CLI cache by running the following command:

 rm -r ~/.aws/cli/cache

Conclusion

In this tutorial, you learned how to enforce using MFA with Yubikey for your CLI operations. This way, the access key you store in your credentials file is just used to assume the role with the actual permissions. The stored keys have no permissions at all. Therefore even if they are compromised, as long as the attacker doesn’t have access to the physical security key, they will not be useful to them. I hope you found the article helpful in improving your AWS account security.
aws powershell, security

If you are working with AWS, it’s considered a good practice to rotate AWS access keys. When working with AWS resources, I try to use role-based access controls, but it’s not always possible to stay in the AWS ecosystem. At the very least, I use my IAM user credentials locally in my dev environment. The ability to replace these keys easily can help increase your AWS account’s security. In this article, you will implement a PowerShell script to rotate your IAM access keys. It works with multiple profiles, so if all your passwords are compromised in a security breach (such as the LastPass incident) you can replace all your IAM keys by simply running your script.

Prerequisites

Why rotate AWS access keys?

Rotating AWS Access keys is a best practice for managing the security of your AWS accounts. It is a way to periodically update the keys used to access your AWS resources, which helps protect against unauthorised access to your accounts.

There are several reasons why you should rotate your AWS IAM keys:

  1. Security: One of the main reasons to rotate your IAM keys is to enhance the security of your AWS accounts. Regularly updating your keys can minimize the risk of someone gaining unauthorized access to your accounts.

  2. Compliance: Many regulatory standards and industry best practices recommend rotating IAM keys on a regular basis as a way to ensure the security and integrity of your systems.

  3. Convenience: Rotating IAM keys can also be convenient. It allows you to easily revoke access to your resources if a team member leaves your organisation or a key is lost or compromised.

It’s also advised to use IAM roles where possible, but if you have to use access keys, it’s a good idea to rotate them periodically.

How to rotate AWS access keys?

AWS allows an IAM user to have a maximum of 2 access keys. This way, you can rotate your keys without disruption by following the steps below:

  1. Create a new access key.

  2. (Optional) Replace the old access key with the new one everywhere.

  3. Deactivate the old access key.

  4. (Optional) Test the applications using the new key.

  5. Delete the old access key.

The script you will build in this article focuses on replacing all the keys in your credentials file (stored locally on your computer) in one fell swoop. It assumes the keys are only used in your AWS credentials file. Therefore, it skips steps 2 and 4.

Set up the Test Environment

Before getting into the script, create the test environment. It’s always a good idea to test your code first on some dummy accounts.

In the IAM console, click Users and then Add users.

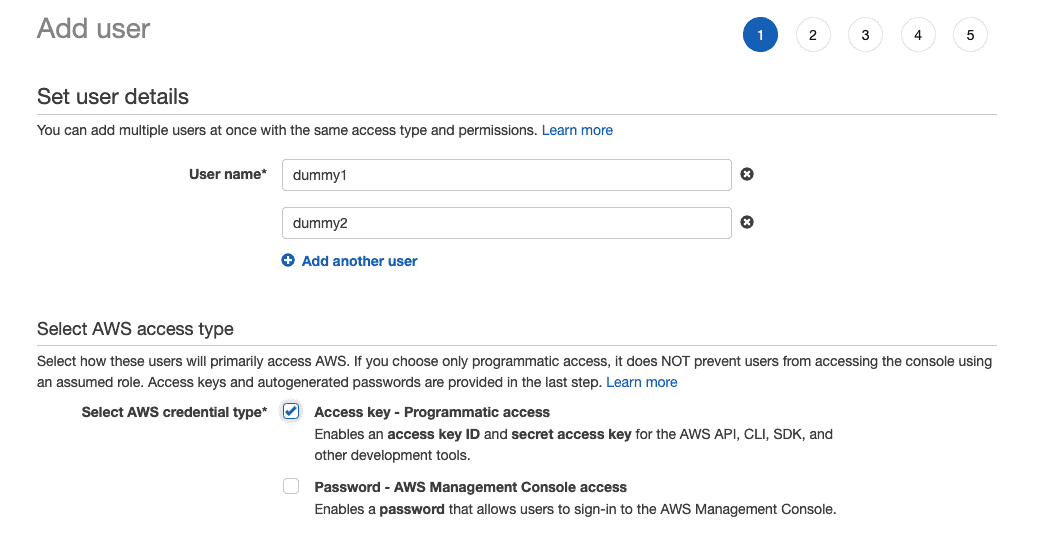
In the user details, enter dummy1 as the user name and click Add another user. Enter dummy2 as the second user name.

Tick Access key - programmatic access in the Select AWS credential type section.

Scroll down to the Attach permissions policies section and click Create policy.

Add user page showing dummy1 and dummy2 users being created and Access key - Programmatic Access is checked as credential type.

Click Next: Permissions.

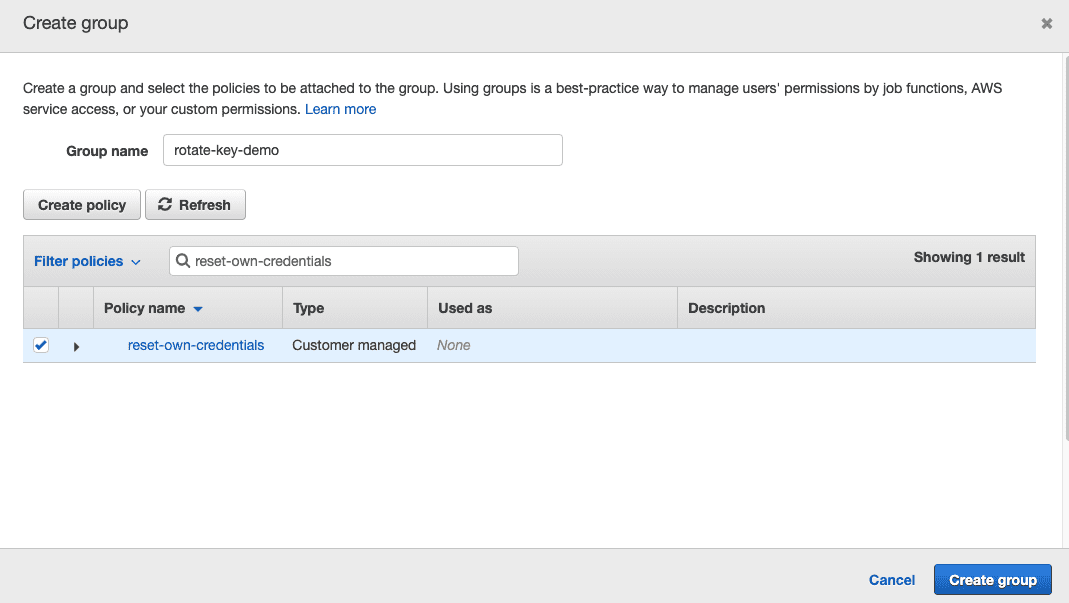
Click Add users to group (which will make it easier to manage policies attached to the users) and click Create group.

Enter rotate-key-demo as the group name.

Click Create policy (opens a new tab).

At this point, the users you create don’t have any permissions. For a user to be able to reset their own credentials, they need some permissions.

In the Create policy page, switch to the JSON tab and paste the following policy:

{
    "Version": "2012-10-17",
    "Statement": [
        {
            "Effect": "Allow",
            "Action": [
                "iam:ListUsers",
                "iam:GetAccountPasswordPolicy"
            ],
            "Resource": "*"
        },
        {
            "Effect": "Allow",
            "Action": [
                "iam:*AccessKey*",
                "iam:ChangePassword",
                "iam:GetUser",
                "iam:*ServiceSpecificCredential*",
                "iam:*SigningCertificate*"
            ],
            "Resource": [
                "arn:aws:iam::*:user/${aws:username}"
            ]
        }
    ]
}

This policy allows the user to only reset their own password and access keys.

Click Next:Tags and then Next:Review.

Enter reset-own-credentials as the policy name and click Create policy.

Switch to the group creation tab and click Refresh to see the newly created policy. If it’s not visible on the page, you can search by name to find it.

After you’ve located the policy, tick the checkbox next to it and click the Create group button.

Create group page showing the group name (rotate-key-demo) and policy )reset-own-credentials) selected int he list. Also there is Create group button at the bottom right.

You should now be back on to Add user page. Click the Next:Tags button, then click Next:Review.

Finally, click the Create users button to finalize the process.

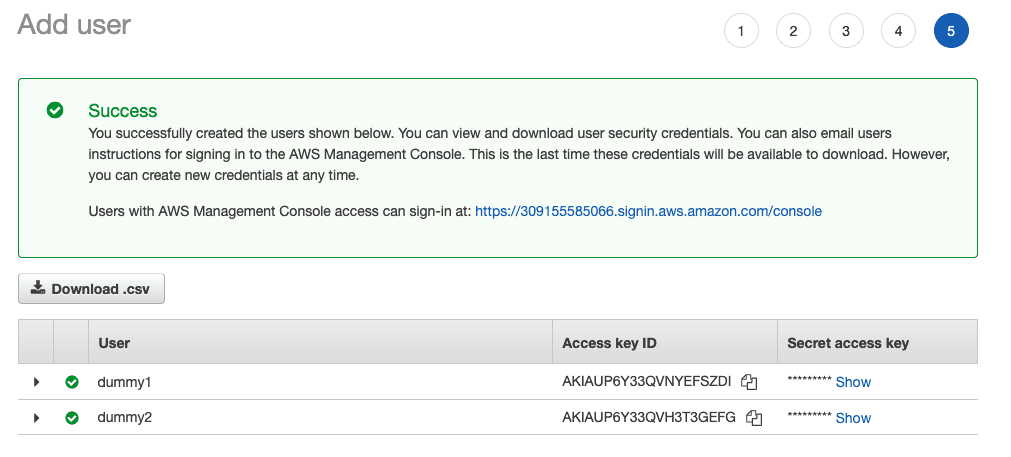
After the users have been created, AWS allows you to note down the secret access key. When you close this page, you will not see the secret access key again so copy them and put them in your credentials file.

Add user page after the users have been created. It shows the user names, access key ids and secret access keys (masked)

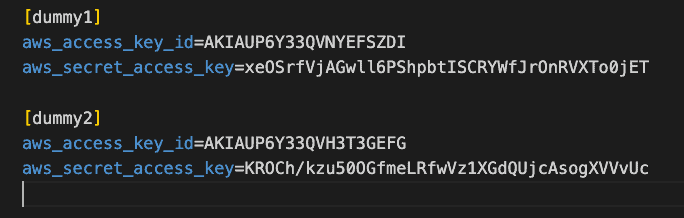
Update your credentials file with these new accounts:

AWS credentials file showing the newly created users' access key ids and secret access keys

Make sure to keep your actual credentials safe somewhere so that you can put them back in your credentials file.

Now that the test environment is ready let’s start looking into the steps to rotate the AWS access keys.

Implement the script

Create a new PowerShell file, such as rotate-keys.ps1 and paste the following code:

param ([switch]$Remove)

$awsProfiles = Get-AWSCredential -ListProfileDetail
$awsProfiles | %{
  Write-Host "Rotating key for profile [$($_.ProfileName)]" 

  try {
    $newIamAccessKeyResult = New-IAMAccessKey -ProfileName $_.ProfileName
  
    Write-Host "Added new access key: $($newIamAccessKeyResult.AccessKeyId)"
    Set-AWSCredential -AccessKey $newIamAccessKeyResult.AccessKeyId -SecretKey $newIamAccessKeyResult.SecretAccessKey -StoreAs $_.ProfileName

    Write-Host "Waiting 10 seconds for the IAM key to propagate"
    Start-Sleep -Seconds 10 
  
    Write-Host "Getting the oldest key..."
    $oldestKey = Get-IAMAccessKey -ProfileName $_.ProfileName | Sort-Object -Property CreateDate | Select-Object -First 1
    Write-Host "Got the oldest key: $($oldestKey.AccessKeyId)"
    
    if ($Remove) {
      Write-Host "Removing key $($oldestKey.AccessKeyId)"
      Remove-IAMAccessKey -AccessKeyId $oldestKey.AccessKeyId -Force -ProfileName $_.ProfileName
    } else {
      Write-Host "Deactivating key $($oldestKey.AccessKeyId)"
      Update-IAMAccessKey -AccessKeyId $oldestKey.AccessKeyId -Status "Inactive" -Force -ProfileName $_.ProfileName
    }
    
    Write-Host "Access key for [$($_.ProfileName)] has been replaced." 
  } catch {
    Write-Host "An error occured: $PSItem" -ForegroundColor DarkRed 
  }
}

Now, investigate the script line by line:

The script accepts a switch type parameter (like a boolean, it evaluates to true when provided and false otherwise). If you run the script with this argument (e.g. ./rotate-keys.ps1 -Remove), it deletes the old key rather than deactivating it. This is useful when you are sure the keys are not used anywhere and you are confident you can replace the old ones immediately.

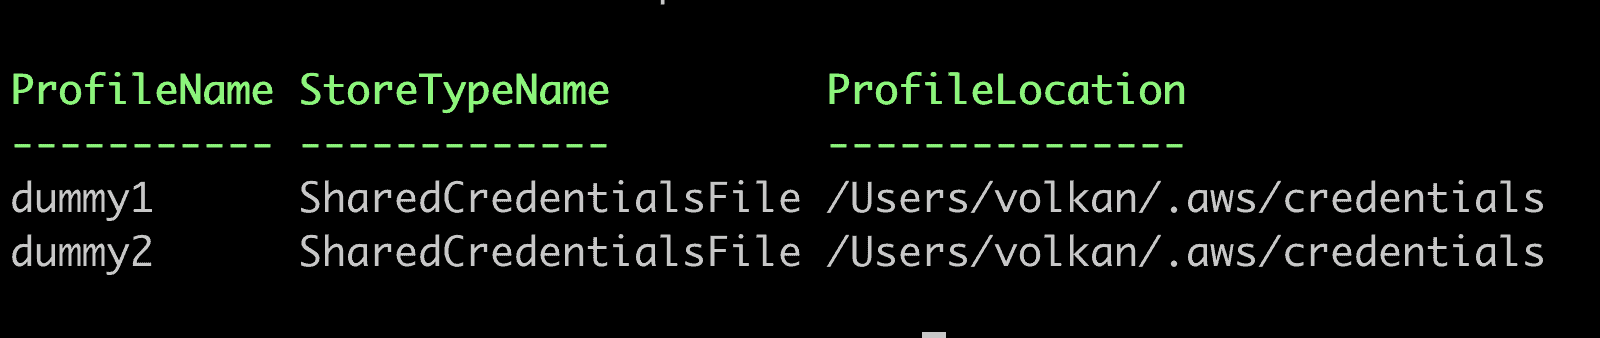
The first action is to enumerate all the access keys in your credentials file carried out by the Get-AWSCredential -ListProfileDetail command. If you run this command in a terminal, you should see the following result:

Get-AWSCredential output showing the profilename, storetypename (SharedCredentialsFile) and profile location

It then loops through all the profiles.

First, it creates a new key and updates the credentials file:

$newIamAccessKeyResult = New-IAMAccessKey -ProfileName $_.ProfileName
  
Write-Host "Added new access key: $($newIamAccessKeyResult.AccessKeyId)"
Set-AWSCredential -AccessKey $newIamAccessKeyResult.AccessKeyId -SecretKey $newIamAccessKeyResult.SecretAccessKey -StoreAs $_.ProfileName

In my tests, it takes a few seconds for the new key to propagate, so there is a 10-second delay added to ensure you don’t get an access denied error. You can experiment with this value and see what works best for you.

The next step is to find the oldest key to remove or deactivate. It does this by calling the Get-IAMAccessKey cmdlet. It sorts the results by CreateDate and gets the first result which is the oldest created key.

Then it either removes it completely or deactivates it so that you can undo it easily:

if ($Remove) {
  Write-Host "Removing key $($oldestKey.AccessKeyId)"
  Remove-IAMAccessKey -AccessKeyId $oldestKey.AccessKeyId -Force -ProfileName $_.ProfileName
} else {
  Write-Host "Deactivating key $($oldestKey.AccessKeyId)"
  Update-IAMAccessKey -AccessKeyId $oldestKey.AccessKeyId -Status "Inactive" -Force -ProfileName $_.ProfileName
}

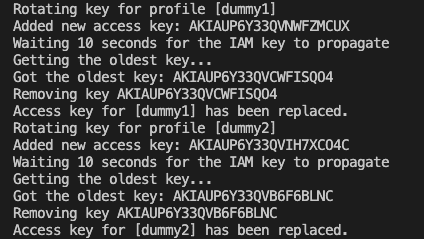
Run the script with the Remove argument, and it should look like this:

Script output showing the access keys have been replaced.

Check the IAM console and make sure the active key matches the one in your credentials file and it’s the newest one.

Now you can replace the dummy keys with your actual ones and rotate them easily by running this script whenever you want.

Conclusion

Dealing with security is always hard. Generally, there is always a security vs convenience trade-off. By automating security-related tasks as much as possible, you can reduce this friction and maintain more secure systems easier. This script and tutorial are just an attempt in this direction. Hope it helps.

hobby retro, gaming, console

Retro gaming is quite popular among geeks. Retro gaming consoles allow people who grew up in the 80s and 90s to relive their fond memories. I still remember the endless hours I spent playing my Commodore 64. We didn’t have hi-res graphics back in the day but we surely enjoyed those games. In this post, I will show you how to acquire a retro gaming console and share my experiences with it.

Getting the console

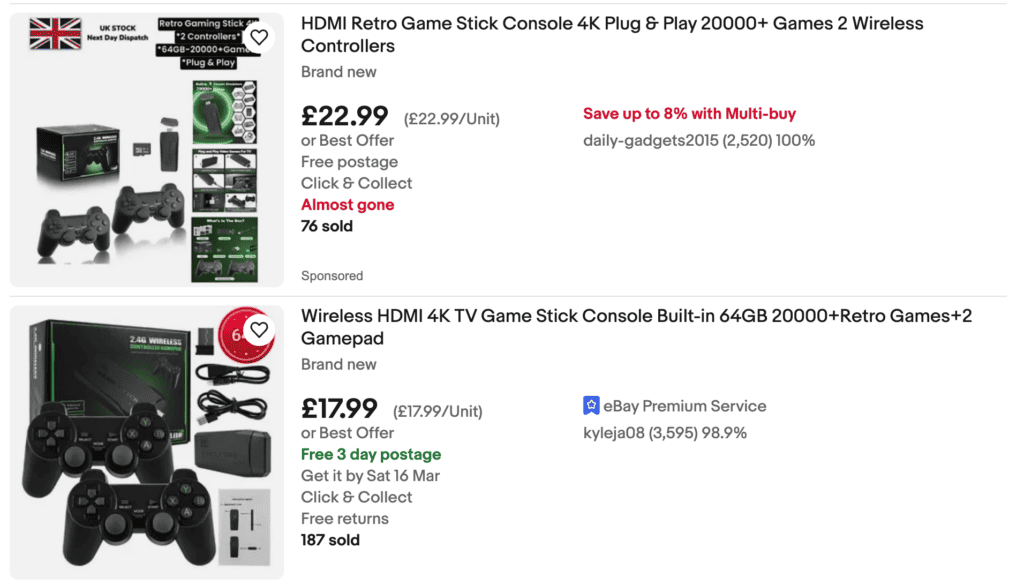
This part is simply ordering an item but I wasn’t aware these things existed so it may be a surprise to some of you too. Just go to eBay and search “retro game console”.

You should get a LOT of results that look identical and look like the ones shown below:

Screenshot of identical retro gaming consoles listed on eBay

Of course, I can only show the UK ones, but since the kits look identical I’m sure they are pretty much the same everywhere for the price of £20 and equivalent.

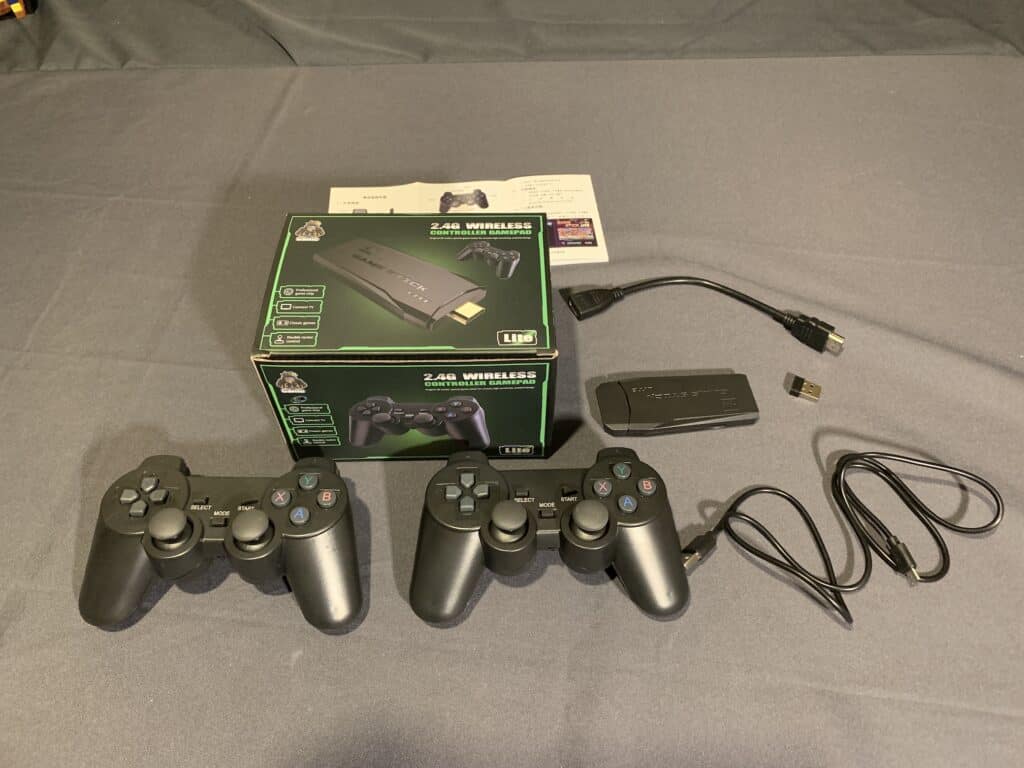
Once you unpack your box, you get these contents:

Contents of the kit

Contents:

  • 1x Host

  • 2x Gamepad (battery not included)

  • 1x 64G memory card

  • 1x USB receiver

  • 1x HDMI cable

  • 1x USB power cable

  • 1x Manual

Setting Up the Console

Normally I would never plug in a product like this, but it’s completely offline. It connects to your TV via HDMI. It’s a self-contained small Linux box running Retroarch OS. All the games are already installed so no network connection is required. This gave me assurance for security and I plugged in the box and put batteries in the gamepad.

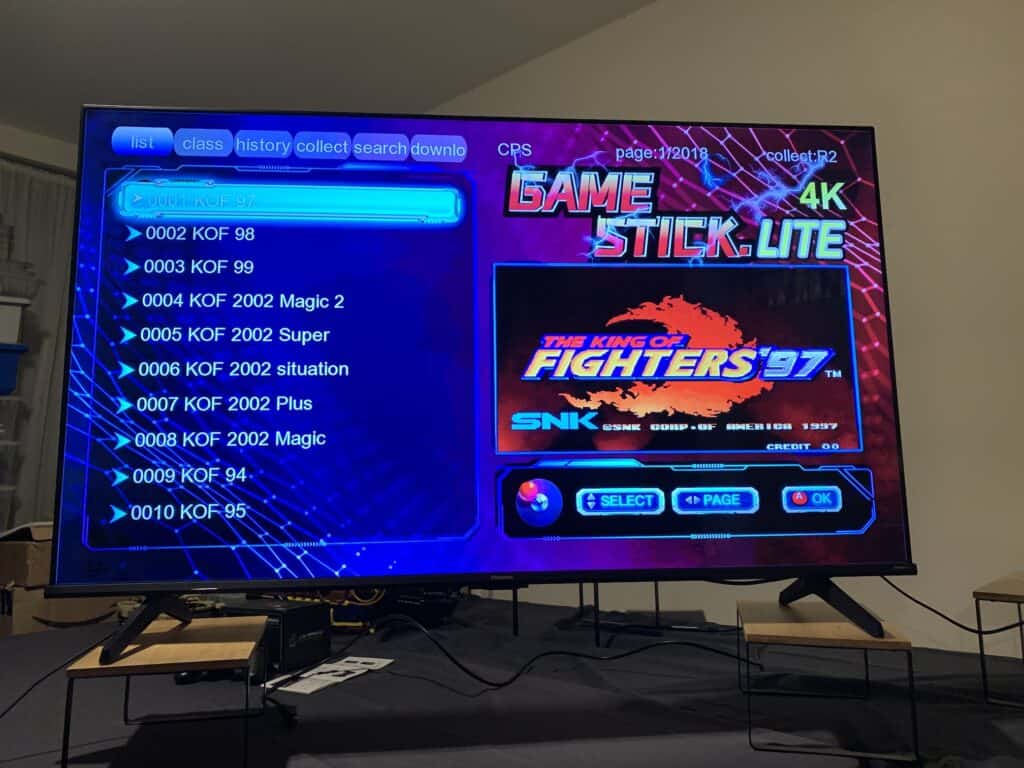
It boots very quickly and you get a list of the games already:

Retro gaming console showing the list of installed games

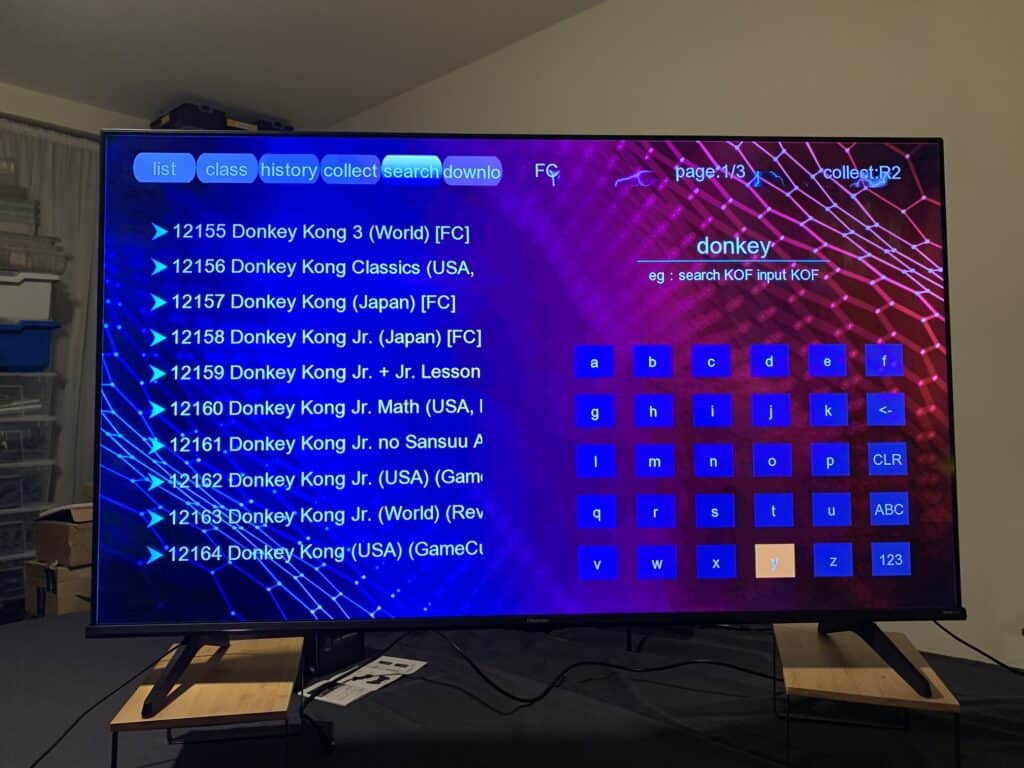
There are so many games and navigation may be a bit challenging at first because you have to get accustomed to the buttons on the gamepad.

Retro gaming console showing the search results for donkey and showing all versions of Donkey Kong game.

Once you’ve got hold of that, all you have to do is find your childhood’s favourite games:

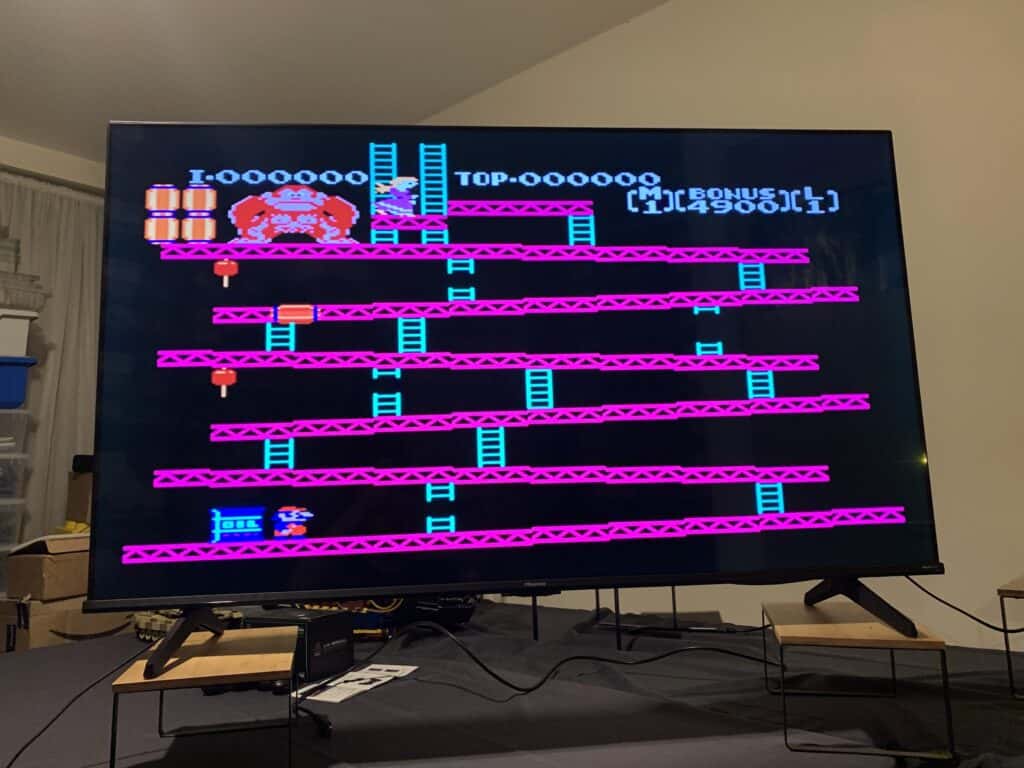
Donkey Kong game in progress

Conclusion

Ideally, I’d like to build my own retro gaming console, probably based on a new Raspberry Pi 5. That way I can enjoy every step of the experience, not just the result. But it’s also good to know that to get the job done, all you have to do is fork over £20, plug a small computer into your TV and you’re good to go!