There is a slightly different version of this article published recently on Twilio Blog: Get notified of new magazine issues using web scraping and SMS with C# .NET. That version uses a worker service rather than a scheduled console application and uses SMS as the notification channel. The article you’re about to read has the extra step of importing the PDFs into Calibre. If you’re interested in the topic, I recommend checking out both versions.
As a Raspberry PI fan, I like to read The MagPi Magazine, which is freely available as PDFs. The problem is I tend to forget to download it manually every month, so I decided to automate the process. I use Calibre as my ebook management software (I blogged about my setup here).
The MagPi Magazine Tracker Architecture and Workflow
I wanted this project to periodically check the latest issue, download it when it’s available and import it into Calibre and send me a notification email so that I can connect to my ebook library and check out the issue. So here’s the architecture to achieve this goal:
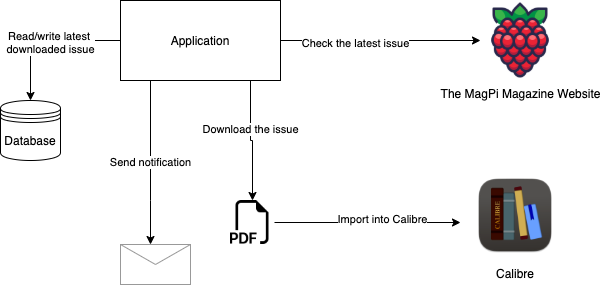
Here’s the workflow:
- The application is triggered based on a schedule. Since MagPi is a monthly magazine, it should be fine to run it every week.
- The application fetches the MagPi page and parses the HTML to find out the latest issue.
- It then checks its database (a flat file or a JSON would suffice for this project).
- If it’s a new issue, it then downloads the PDF to the local file system.
- It imports the PDF into Calibre using Calibre’s CLI.
- It sends a notification telling the user that a new issue is available.
- The user (which is me!) connects to calibre-web (the web frontend I used to view my Calibre libraries) and reads the magazine.
Prerequisites
The full source code is freely available on my GitHub repo if you’re just interested in getting a copy of the application and playing around with it. If you’re new to GitHub, you might want to have a look at this article: How to clone a GitHub repository.
To follow along and implement the project, you will need the following:
- Calibre
- A Twilio SendGrid account (with an API key and sender address set up. The beginning of this article may be useful to set up your account)
Implementation
For a scheduled task, you generally have two options:
- External scheduler: This is generally part of the operating system (such as Task Scheduler for Windows and Crontab for macOS/Linux)
- Internal scheduler: Run the main application in an infinite loop with sleeping the amount of time you want to wait for the next run.
I think an internal scheduler works better if your application needs to run quite often, like every hour or so. Using an external scheduler makes more sense to me for longer cycles, like running an application once a week, such as this project. Therefore, I’m going to implement it using a Console Application and schedule it using Crontab. If you are on Windows, you can take a look at this article or search for scheduling tasks on Windows.
To create a Console Application, run the following commands at the root level of your project:
mkdir MagPiTracker
cd MagPiTracker
dotnet new console
Persistence
Let’s start with the persistence layer. All you need to read/write is the latest issue you saved in your Calibre library, so create a folder called Persistence and add an interface named IMagPiRepository.cs that looks like this:
namespace MagPiTracker.Persistence;

public interface IMagPiRepository
{
    Task<int> GetLastSavedIssueNumber();
    Task SaveLastSavedIssueNumber(int newIssueNumber);
}
The actual implementation is going to be a simple JSON reader/writer for this project. You can choose to implement a SQLite database or a simple txt file. For JSON, add the Newtonsoft.Json package to your project by running:
dotnet add package NewtonSoft.Json
Then, create a file called db.json and set the initial value to 0:
{
  "lastSavedIssueNumber": 0
}
Also, make sure that it is going to be copied to the output directory. Right-click on properties and set Copy to output directory to Copy always. I prefer Copy always to Copy if newer because it’s more straightforward and predictable.
Create a new file named JsonMagPiRepository.cs under the Persistence folder. Update the code as below:
using Newtonsoft.Json.Linq;

namespace MagPiTracker.Persistence;

public class JsonMagPiRepository : IMagPiRepository
{
    private const string DB_PATH = "./persistence/db.json";

    public async Task<int> GetLastSavedIssueNumber()
    {
        var rawContents = await File.ReadAllTextAsync(DB_PATH);
        return JObject.Parse(rawContents).GetValue("lastSavedIssueNumber").Value<int>();
    }

    public async Task SaveLastSavedIssueNumber(int newIssueNumber)
    {
        var newValue = new { lastSavedIssueNumber = newIssueNumber };
        await File.WriteAllTextAsync(DB_PATH, Newtonsoft.Json.JsonConvert.SerializeObject(newValue));
    }
}
To test the data layer, update Program.cs with the following code:
using MagPiTracker.Persistence;

Console.WriteLine("Running The MagPi Tracker...");

var repository = new JsonMagPiRepository();
var lastSavedIssueNumber = await repository.GetLastSavedIssueNumber();
Console.WriteLine($"Last Saved Issue Number: {lastSavedIssueNumber}");

// Test write and read back
await repository.SaveLastSavedIssueNumber(120);
Console.WriteLine($"[Test] Last Saved Issue Number: {await repository.GetLastSavedIssueNumber()}");
The output should look like this:
Running The MagPi Tracker...
Last Saved Issue Number: 0
Test Last Saved Issue Number: 120
Issue Checker
The next task is to implement the service to check the latest available issue on The MagPi Magazine page. What we need to get out of this service is:
- The latest issue number
- The link to the PDF
- The link to the cover image (to make the notification email prettier)
So create an interface called IMagPiService.cs that looks like this:
namespace MagPiTracker.MagPi;

public interface IMagPiService
{
    Task<int> GetLatestIssueNumber();
    Task<string> GetIssuePdfUrl(int issueNumber);
    Task<string> GetLatestIssueCoverUrl();
}
Create a class called MagPiService that implements the interface, and that looks like this initially:
namespace MagPiTracker.MagPi;

public class MagPiService : IMagPiService
{
    public async Task<int> GetLatestIssueNumber()
    {
        throw new NotImplementedException();
    }

    public async Task<string> GetIssuePdfUrl(int issueNumber)
    {
        throw new NotImplementedException();
    }

    public async Task<string> GetLatestIssueCoverUrl()
    {
        throw new NotImplementedException();
    }
}
Now, let’s focus on getting the latest issue number. The easiest way to find the latest issue number is by going to the issues page, which looks like this at the time of this writing:

We’re going to utilize some web scraping to get the job done. In this project, I used a library called AngleSharp to achieve this. Run the following command to add it to your project:
dotnet add package AngleSharp
Then, update your GetLatestIssueNumber implementation as shown below:
using AngleSharp;

namespace MagPiTracker.MagPi;

public class MagPiService : IMagPiService
{
    private const string MAGPI_ROOT_URL = "https://magpi.raspberrypi.com";

    public async Task<int> GetLatestIssueNumber()
    {
        var config = AngleSharp.Configuration.Default.WithDefaultLoader();
        var context = BrowsingContext.New(config);
        var document = await context.OpenAsync($"{MAGPI_ROOT_URL}/issues/");
        var latestCoverLinkSelector = ".c-latest-issue > .c-latest-issue__cover > a";
        var latestCoverLink = document.QuerySelector(latestCoverLinkSelector);
        var rawLink = latestCoverLink.Attributes.GetNamedItem("href").Value;
        return int.Parse(rawLink.Substring(rawLink.LastIndexOf('/') + 1));
    }

    public async Task<string> GetIssuePdfUrl(int issueNumber)
    {
        throw new NotImplementedException();
    }

    public async Task<string> GetLatestIssueCoverUrl()
    {
        throw new NotImplementedException();
    }
}
To put this to the test, update your Program.cs as below and run the application:
using MagPiTracker.MagPi;
using MagPiTracker.Persistence;

Console.WriteLine("Running The MagPi Tracker...");

var repository = new JsonMagPiRepository();
var magpiService = new MagPiService();

var lastSavedIssueNumber = await repository.GetLastSavedIssueNumber();
Console.WriteLine($"Last Saved Issue Number: {lastSavedIssueNumber}");

var latestIssueNumber = await magpiService.GetLatestIssueNumber();
Console.WriteLine($"Latest Issue Number: {latestIssueNumber}");
You should see an output similar to this:
Running The MagPi Tracker...
Last Saved Issue Number: 120
Latest Issue Number: 121
Your latest issue will probably be different depending on when you are running it.
Download the PDF
The next challenge is to find the direct link to the PDF. If you click the Download Free PDF link, the page does not start the download automatically. Instead, you land on a donation page that looks like this:
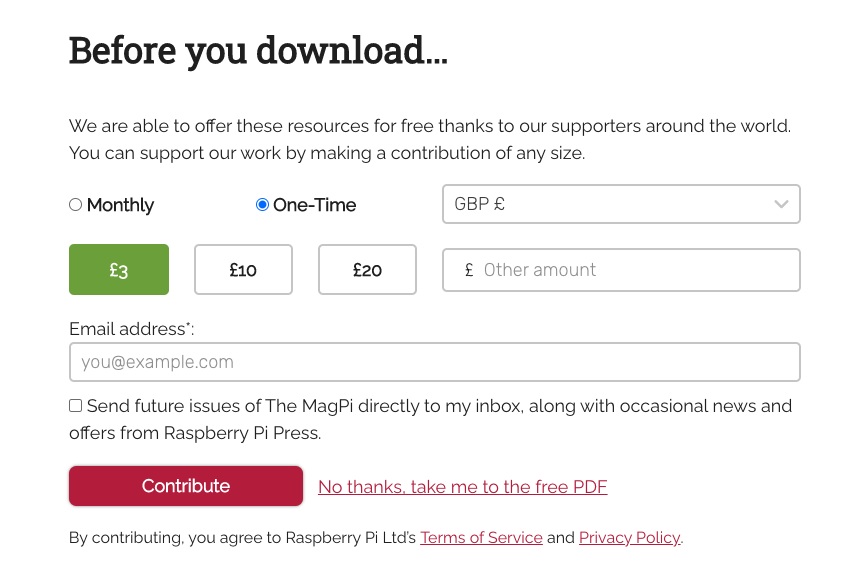
I’d strongly recommend everybody to consider donating. This is a great magazine with professional quality, and it’s full of valuable knowledge about everything Raspberry Pi.
Since they are allowing free downloads and Raspberry Pi is mostly a favourite among maker-community, I’m hoping they wouldn’t mind this little project.
If you click on the “No thanks, take me to the free PDF” link, the PDF download starts automatically. This is actually done by a redirect that contains an iframe with the src property set to the URL of the PDF. So to download the PDF, you need to parse the URL.
Create a new project directory called Downloader and add a new interface named IDownloadService.cs that looks like this:
namespace MagPiTracker.Downloader;

public interface IDownloadService
{
    Task DownloadFile(string url, string localPath);
}
As you can tell from the method name and its arguments, this service is going to download the file at the given URL and save it to the local file system.
For the actual implementation, create a class called DownloadService implementing the interface and update the code with this:
namespace MagPiTracker.Downloader;

public class DownloadService : IDownloadService
{
    public async Task DownloadFile(string url, string localPath)
    {
        using HttpClient client = new HttpClient(); // use HttpClient factory in production
        using HttpResponseMessage response = await client.GetAsync(url);
        using Stream downloadedFileStream = await response.Content.ReadAsStreamAsync();

        using (var localFileStream = new FileStream(localPath, FileMode.Create, FileAccess.Write))
        {
            await downloadedFileStream.CopyToAsync(localFileStream);
        }
    }
}
To test these changes, update the Program.cs file with the following code:
using MagPiTracker.Downloader;
using MagPiTracker.MagPi;
using MagPiTracker.Persistence;

Console.WriteLine("Running The MagPi Tracker...");

var repository = new JsonMagPiRepository();
var magpiService = new MagPiService();
var downloadService = new DownloadService();

var lastSavedIssueNumber = await repository.GetLastSavedIssueNumber();
Console.WriteLine($"Last Saved Issue Number: {lastSavedIssueNumber}");

var latestIssueNumber = await magpiService.GetLatestIssueNumber();
Console.WriteLine($"Latest Issue Number: {latestIssueNumber}");

if (latestIssueNumber > lastSavedIssueNumber)
{
    var pdfUrl = await magpiService.GetIssuePdfUrl(latestIssueNumber);
    var localPath = $"TheMagPiMagazine_{latestIssueNumber.ToString().PadLeft(3, '0')}.pdf";
    await downloadService.DownloadFile(pdfUrl, localPath);
    Console.WriteLine($"Latest Issue PDF has been saved to {localPath}");
}
else
{
    Console.WriteLine($"No new issue found. Exiting.");
}
The final version of the application checks its database and compares it to the latest issue. If the latest one is newer, then it downloads the PDF. Run the application, and you should see the new PDF downloaded to your local machine. Your output should look like this:
Running The MagPi Tracker...
Last Saved Issue Number: 120
Latest Issue Number: 121
Latest Issue PDF has been saved to TheMagPiMagazine_121.pdf
Importing to Calibre
The next step is to import this file into Calibre. An easy way to wrap external CLIs is the CliWrap library. Add it to your project via NuGet by running the command below:
dotnet add package CliWrap
Create a new folder called Calibre and a new interface called ICalibreService.cs under it.
Update the interface with this code:
namespace MagPiTracker.Calibre;

public interface ICalibreService
{
    Task ImportMagPiMagazine(int issueNumber, string pdfPath);
}
This method is going to be tailored for The MagPi Magazine. The MagPi-related information can be stripped out of the method and put somewhere else, like a config file, but since I’m not aiming to make this a generic downloader, for the time being, it should do the job.
Create the implementation class named CalibreService and implement the interface like this:
using System.Text;
using CliWrap;

namespace MagPiTracker.Calibre;

public class CalibreService : ICalibreService
{
    private const string LIBRARY_PATH = "{PATH TO YOUR CALIBRE LIBRARY}";

    public async Task ImportMagPiMagazine(int issueNumber, string pdfPath)
    {
        var issueTitle = $"The MagPi Issue {issueNumber.ToString().PadLeft(3, '0')}";
        var authors = "Raspberry Pi Press";
        var series = "The MagPi Magazine";

        var stdOutBuffer = new StringBuilder();
        var stdErrBuffer = new StringBuilder();

        await Cli.Wrap("/Applications/calibre.app/Contents/MacOS/calibredb")
            .WithArguments($"add --title \"{issueTitle}\" --with-library \"{LIBRARY_PATH}\" --authors \"{authors}\" --series \"{series}\" \"{pdfPath}\"")
            .WithStandardOutputPipe(PipeTarget.ToStringBuilder(stdOutBuffer))
            .WithStandardErrorPipe(PipeTarget.ToStringBuilder(stdErrBuffer))
            .ExecuteAsync();

        var stdOut = stdOutBuffer.ToString();
        var stdErr = stdErrBuffer.ToString();

        Console.WriteLine(stdOut);
        Console.WriteLine(stdErr);
    }
}
Make sure to update LIBRARY_PATH. Also, update the application path depending on your operating system.
Then, update the Program.cs like this:
using MagPiTracker.Calibre;
using MagPiTracker.Downloader;
using MagPiTracker.MagPi;
using MagPiTracker.Notifications;
using MagPiTracker.Persistence;

Console.WriteLine("Running The MagPi Tracker...");

var repository = new JsonMagPiRepository();
var magpiService = new MagPiService();

var lastSavedIssueNumber = await repository.GetLastSavedIssueNumber();
Console.WriteLine($"Last Saved Issue Number: {lastSavedIssueNumber}");

var latestIssueNumber = await magpiService.GetLatestIssueNumber();
Console.WriteLine($"Latest Issue Number: {latestIssueNumber}");

if (latestIssueNumber > lastSavedIssueNumber)
{
    var pdfUrl = await magpiService.GetIssuePdfUrl(latestIssueNumber);
    var localPath = $"TheMagPiMagazine_{latestIssueNumber.ToString().PadLeft(3, '0')}.pdf";

    var downloadService = new DownloadService();
    await downloadService.DownloadFile(pdfUrl, localPath);
    Console.WriteLine($"Latest Issue PDF has been saved to {localPath}");

    var calibreService = new CalibreService();
    await calibreService.ImportMagPiMagazine(latestIssueNumber, new FileInfo(localPath).FullName);
    Console.WriteLine($"Latest Issue has been imported into Calibre");
}
else
{
    Console.WriteLine($"No new issue found. Exiting.");
}
Run the application, and you should see an output like this:
Running The MagPi Tracker...
Last Saved Issue Number: 120
Latest Issue Number: 121
Latest Issue PDF has been saved to TheMagPiMagazine_121.pdf
    /Users/.../scheduled-magpi-magazine-tracker/src/TheMagPiMagazine_121.pdf

The following books were not added as they already exist in the database (see --duplicates option or --automerge option):
  The MagPi Issue 121

Latest Issue has been imported into Calibre
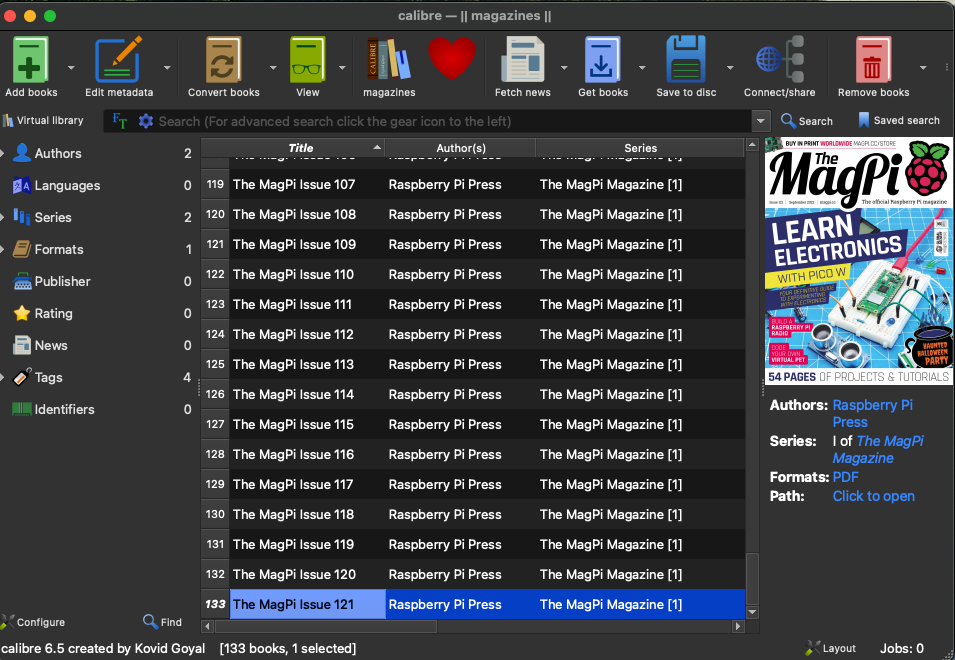
You can go ahead and open your Calibre application, and you should see the newly imported issue in your library:
Cover Image URL
In the previous section, we left out implementing the third method. This is not strictly necessary, but having the cover image would make your notification email look nicer. Also, from a practical point of view, if you’re not interested in the topics covered in that issue, you may delay looking at that issue.
To get the cover URL, revisit MagPiService class and update the GetLatestIssueCoverUrl method’s implementation as below:
public async Task<string> GetLatestIssueCoverUrl()
{
    var config = AngleSharp.Configuration.Default.WithDefaultLoader();
    var context = BrowsingContext.New(config);
    var document = await context.OpenAsync($"{MAGPI_ROOT_URL}/issues/");
    var latestCoverImageSelector = ".c-latest-issue > .c-latest-issue__cover > a > img";
    var latestCoverImage = document.QuerySelector(latestCoverImageSelector);
    var latestCoverImageUrl = latestCoverImage.Attributes.GetNamedItem("src").Value;

    return latestCoverImageUrl;
}
This will come in handy in the next section.
Notifications
It would be nice to know when a new issue is imported into your library, so the next step is to add a notification mechanism to the application. In this example, I will use email notifications as that’s the cheapest and simplest method. I will use SendGrid as my SMTP provider.
To store the API key, initialize dotnet user-secrets and create a new secret by running the following commands:
dotnet user-secrets init
dotnet user-secrets set SendGrid:ApiKey {YOUR API KEY}
In the project, create a new project directory called Notifications and a new interface called INewIssueNotificationService.cs with the following code:
namespace MagPiTracker.Notifications;

public interface INewIssueNotificationService
{
    Task SendNewIssueNotification(int issueNumber, string coverUrl);
}
Before implementing the class, add SendGrid SDK by running:
dotnet add package SendGrid
Now add a new class called EmailNotificationService.cs and update its code with this:
using System.Reflection;
using Microsoft.Extensions.Configuration;
using SendGrid;
using SendGrid.Helpers.Mail;

namespace MagPiTracker.Notifications;

public class EmailNotificationService : INewIssueNotificationService
{
    public async Task SendNewIssueNotification(int issueNumber, string coverUrl)
    {
        IConfiguration config = new ConfigurationBuilder()
            .AddUserSecrets(Assembly.GetExecutingAssembly(), optional: true, reloadOnChange: false)
            .Build();

        var sendGridClient = new SendGridClient(apiKey: config["SendGrid:ApiKey"]);

        var from = new EmailAddress("{YOUR VERIFIED SENDER EMAIL ADDRESS}", "The MagPi Magazine Issue Checker");
        var to = new EmailAddress("{YOUR RECIPIENT EMAIL ADDRESS}", "{YOUR DISPLAY NAME}");

        var htmlContent = await File.ReadAllTextAsync("./notifications/email-template.html");
        var htmlWithData = htmlContent.Replace("%{COVER_URL}", coverUrl);

        var msg = MailHelper.CreateSingleEmail(from, to, "The MagPi Magazine New Issue", htmlWithData, htmlWithData);
        await sendGridClient.SendEmailAsync(msg);
    }
}
This code reads the API key from user secrets so that it’s never accidentally pushed to source control. Also, it reads the email template from an HTML file. Create a new file named email-template.html, and set it to be copied to the output always (as you did with db.json) and update its contents as shown below:
<!DOCTYPE html>
<html lang="en">
<head>
    <meta charset="UTF-8">
</head>
<body>
<h1>New MagPi Magazine is out!</h1>
<p>
    <img src="%{COVER_URL}" />
</p>
</body>
</html>
There are better ways for variable replacement (using a templating engine such as Handlebars, Razor etc.), but to keep things simple, I just put a placeholder and replaced the string. Update the Program.cs to reflect the latest changes and test:
using MagPiTracker.Calibre;
using MagPiTracker.Downloader;
using MagPiTracker.MagPi;
using MagPiTracker.Notifications;
using MagPiTracker.Persistence;

Console.WriteLine("Running The MagPi Tracker...");

var repository = new JsonMagPiRepository();
var magpiService = new MagPiService();

var lastSavedIssueNumber = await repository.GetLastSavedIssueNumber();
Console.WriteLine($"Last Saved Issue Number: {lastSavedIssueNumber}");

var latestIssueNumber = await magpiService.GetLatestIssueNumber();
Console.WriteLine($"Latest Issue Number: {latestIssueNumber}");

if (latestIssueNumber > lastSavedIssueNumber)
{
    var pdfUrl = await magpiService.GetIssuePdfUrl(latestIssueNumber);
    var localPath = $"TheMagPiMagazine_{latestIssueNumber.ToString().PadLeft(3, '0')}.pdf";

    var downloadService = new DownloadService();
    await downloadService.DownloadFile(pdfUrl, localPath);
    Console.WriteLine($"Latest Issue PDF has been saved to {localPath}");

    var calibreService = new CalibreService();
    await calibreService.ImportMagPiMagazine(latestIssueNumber, new FileInfo(localPath).FullName);
    Console.WriteLine($"Latest Issue has been imported into Calibre");

    var latestIssueCoverUrl = await magpiService.GetLatestIssueCoverUrl();
    var notificationService = new EmailNotificationService();
    await notificationService.SendNewIssueNotification(latestIssueNumber, latestIssueCoverUrl);

    await repository.SaveLastSavedIssueNumber(latestIssueNumber);
    File.Delete(localPath);
}
else
{
    Console.WriteLine($"No new issue found. Exiting.");
}
In addition to the previous tasks, you are now sending the notification email. Once everything is done successfully, the code updates the local JSON file with the latest issue number so that it doesn’t download the same issue over and over again. Also, it deletes the local PDF to keep things nice and tidy.
Run the application, and you should receive a notification that looks like this:

You can add more stuff like the link to the PDF, issue number etc., but just to ping myself this much information is enough for me.
Scheduling
Let’s bring this home by scheduling the application so that it does its thing in an automated fashion.
As mentioned before, on Windows, I’d recommend using the built-in Task Scheduler. On macOS/Linux systems, crontab does the job.
Firstly, build your application and place the deployment package wherever you want to run the application. To edit cron jobs, run
I will run the application every Friday at 5 AM and will use this cron expression: 0 5 * * 5
To find where the dotnet executable is located, you can use the which command:
Also, the cron job will be run in a different working directory. To avoid path issues, it’s best to change to our application directory before running it. So the cron job looks like this:
0 5 * * 5 cd /Users/.../Deployment/MagPiTracker && /usr/local/share/dotnet/dotnet MagPiTracker.dll
Crontab uses the following syntax, and you can customize your schedule based on this:
* * * * * command
* - minute (0-59)
* - hour (0-23)
* - day of the month (1-31)
* - month (1-12)
* - day of the week (0-6, 0 is Sunday)
Why No Docker?
Normally I try to run everything in Docker containers. In this project, I chose to run the application on bare metal. The reason for this is to be able to import the PDFs into my Calibre library, which is also running on bare metal. If I were to run this application in Docker, I wouldn’t be able to run Calibre CLI on the host computer. If I didn’t have this constraint, I would have definitely Dockerized the application.
Conclusion
I hope you enjoyed this little project. As a reminder, please consider donating to the Raspberry Pi Press and use their own mechanism, but if you cannot afford it and since the PDFs are already available out there, you can go ahead and use this project and hopefully learn some new technologies along the way.