In a previous article, we looked into how to develop your own CLI tools with dotnet CLI and CliFx library. This article builds on that knowledge and adds more advanced features of CliFx. It also adds a new library called Sharprompt to add interactive features to your CLI. Without further ado, let’s develop an interactive CLI.
Set up the project
First, clone the starter project to get the project up and running:
git clone https://github.com/volkanpaksoy/sendgrid-dynamic-template-email-manager-cli.git --branch 00-starter-project
Then, open the solution in your IDE and look at Program.cs:
using CliFx;

await new CliApplicationBuilder()
    .AddCommandsFromThisAssembly()
    .SetExecutableName("dtm")
    .SetDescription("CLI to manage SendGrid Dynamic Email Templates")
    .SetTitle("SendGrid Dynamic Email Template Manager")
    .Build()
    .RunAsync();
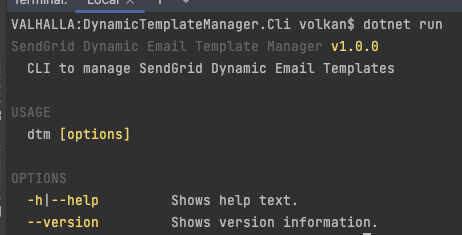
This setup is all it takes to add CliFx to the Console Application and convert it into a CLI. Next, run the application, and you should see a result as below:
A nice feature of a dotnet CLI is that it can be installed globally on your computer so that you don’t have to navigate to the project folder every time to run it.
To convert a Console Application into an installable dotnet tool, you add the following three lines to the .csproj file (the highlighted lines 8-10):
<Project Sdk="Microsoft.NET.Sdk">
    <PropertyGroup>
        <OutputType>Exe</OutputType>
        <TargetFramework>net6.0</TargetFramework>
        <ImplicitUsings>enable</ImplicitUsings>
        <Nullable>enable</Nullable>
        <DockerDefaultTargetOS>Linux</DockerDefaultTargetOS>
        <PackAsTool>true</PackAsTool>
        <ToolCommandName>dtm</ToolCommandName>
        <PackageOutputPath>./nupkg</PackageOutputPath>
    </PropertyGroup>
    <ItemGroup>
      <PackageReference Include="CliFx" Version="2.2.6" />
    </ItemGroup>
</Project>
Now, run the following command to publish the project as a NuGet package under the ./nupkg folder:
Finally, install the CLI by running the following command:
dotnet tool install --global --add-source ./nupkg DynamicTemplateManager.Cli
You should see that your CLI is now installed as a dotnet tool:

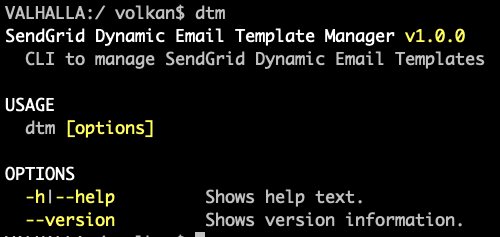
Now you can open a terminal and run dtm as a command, and your application will run:
At this point, you have a working CLI developed with the dotnet tool and CliFx, but you don’t have any functionality to manage SendGrid Dynamic Email Templates.
Set up SendGrid
To send Emails with SendGrid, you will need to have a SendGrid account, an API key and a valid sender email address or domain. Setting all these deserves a separate blog post. I will not add all those details in this article to keep the focus on developing the CLI. Instead, I recommend reading this article to complete the basic setup. The rest of the article is going to assume you completed these steps.
All commands that call the SendGrid API need access to an API key value. It’s best to leverage environment variables to avoid providing the API key every time you run a command.
Fortunately, CliFx supports Environment Variables. Therefore, we can create an option and give it an alternative environment variable name. If we don’t provide the parameter from the command line, it uses the value stored in the environment variable. To see this in action, create a new folder inside your solution called Commands. Then, under this folder, create a new file named SendGridCommandBase.cs and replace its contents with the code below:
using CliFx.Attributes;

namespace DynamicTemplateManager.Cli.Commands;

public abstract class SendGridCommandBase
{
    [CommandOption("sendgridApiKey", IsRequired = true, EnvironmentVariable = "SENDGRID_API_KEY")]
    public string SendGridApiKey { get; init; }
}
This class is going to be the base class of all SendGrid commands.
To test environment variables, create a temporary command in a file named EnvVarTestCommand.cs.
Replace the contents with the code below:
using CliFx;
using CliFx.Attributes;
using CliFx.Infrastructure;

namespace DynamicTemplateManager.Cli.Commands;

[Command]
public class EnvVarTestCommand : SendGridCommandBase, ICommand
{
    public ValueTask ExecuteAsync(IConsole console)
    {
        Console.WriteLine(SendGridApiKey);
        return default;
    }
}
Add an environment variable named SENDGRID_API_KEY to your system:
export SENDGRID_API_KEY=from_env_var
Now, run the application and provide the sendGridApiKey parameter as shown below:
dotnet run --sendgridApiKey from_cmd
The output should show from_cmd.
Rerun the application, but this time, don’t provide any parameters as shown below:
This time you should see from_env_var on your screen:

Implement the first CLI command
It’s time to get to the meat of the project. You are now going to implement the individual commands for the CLI.
First, delete the EnvVarTestCommand.cs file from the project. If you haven’t followed along so far and would like to start now, you can do that by checking out the branch called 01-sendgrid-configuration:
git checkout 01-sendgrid-configuration
git pull
In the Commands folder, create a subfolder named TemplateCommands, and inside it, create a file named ListTemplatesCommand.cs
Replace the contents of the new file with the code below:
using CliFx;
using CliFx.Attributes;
using CliFx.Infrastructure;

namespace DynamicTemplateManager.Cli.Commands.TemplateCommands;

[Command("list-templates")]
public class ListTemplatesCommand : ICommand
{
    public ValueTask ExecuteAsync(IConsole console)
    {
        Console.WriteLine("list-templates command");

        return default;
    }
}
Now run the application to see if the command is available to use:
The output should look like this:
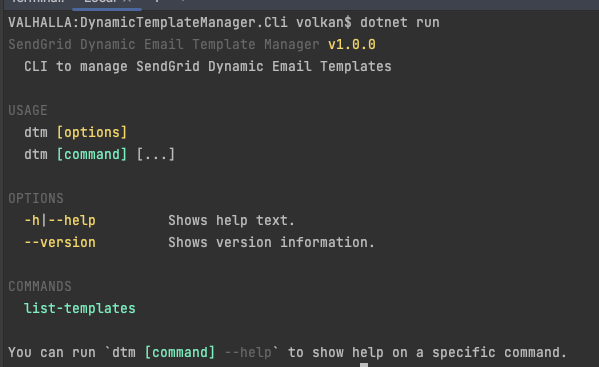
You can see the list-templates command is discovered by CliFx because we initially set it up as
.AddCommandsFromThisAssembly()
Another thing you might have noticed is that when you ran the application, it displayed the help output instead of executing the command. When you were testing the SendGrid API key, EnvVarTestCommand was executed automatically. The difference is that EnvVarTestCommand was decorated with
EnvVarTestCommand didn’t have a name assigned to it, which made it the default command, whereas ListTemplatesCommand is decorated as below:
[Command("list-templates")]
To execute the list-templates command, you need to specify the command explicitly, as shown below:
dotnet run list-templates
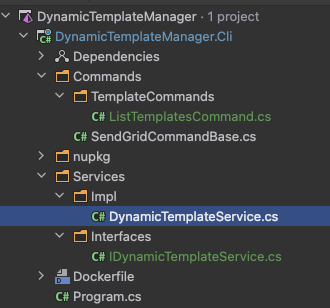
Putting all SendGrid-related code in a separate service is good practice to make the code more testable. So first, create a solution folder named Services. Then, create two more folders under this folder: Interfaces and Impl. Under Interfaces, create a file named IDynamicTemplateService.cs; under the Impl folder, create a file named DynamicTemplateService.cs. Your solution structure at this point should look like this:
Before you start calling SendGrid API, you need to add SendGrid dotnet SDK. Also, to display the results nicely in the console, add the ConsoleTables NuGet package. Finally, for this stage, you are going to refactor the Program.cs file and use dependency injection to instantiate commands and services. To achieve this, you will need Microsoft.Extensions.DependencyInjection and Microsoft.Extensions.Hosting packages.
Run the following code to add these packages to the project:
dotnet add package SendGrid
dotnet add package ConsoleTables
dotnet add package Microsoft.Extensions.DependencyInjection
dotnet add package Microsoft.Extensions.Hosting
Update the Program.cs file with the code below:
using CliFx;
using DynamicTemplateManager.Cli.Commands.TemplateCommands;
using DynamicTemplateManager.Cli.Services.Impl;
using DynamicTemplateManager.Cli.Services.Interfaces;
using Microsoft.Extensions.DependencyInjection;
using Microsoft.Extensions.Hosting;

using IHost host = Host.CreateDefaultBuilder(args)
    .ConfigureServices((hostBuilderContext, services) => services
        // Register services
        .AddTransient<IDynamicTemplateService, DynamicTemplateService>()

        // Register commands
        .AddTransient<ListTemplatesCommand>()
    )
    .Build();

await new CliApplicationBuilder()
    .AddCommandsFromThisAssembly()
    .SetExecutableName("dtm")
    .SetDescription("CLI to manage SendGrid Dynamic Email Templates")
    .SetTitle("SendGrid Dynamic Email Template Manager")
    .UseTypeActivator(host.Services)
    .Build()
    .RunAsync();
Update DynamicTemplateService.cs as below:
using DynamicTemplateManager.Cli.Services.Interfaces;
using Newtonsoft.Json.Linq;
using SendGrid;

namespace DynamicTemplateManager.Cli.Services.Impl;

public class DynamicTemplateService : IDynamicTemplateService
{
    public async Task<List<(string, string)>> ListTemplates(string apiKey)
    {
        var sendGridClient = new SendGridClient(apiKey);
        var queryParams = @"{
            'generations': 'dynamic',
            'page_size': 100
        }";

        var response = await sendGridClient.RequestAsync(
            method: SendGridClient.Method.GET,
            urlPath: $"templates",
            queryParams: queryParams
        );

        if (!response.IsSuccessStatusCode)
        {
            HandleFailedResponse(response);
        }

        var result = response.Body.ReadAsStringAsync().Result;
        var resultJson = JObject.Parse(result);

        var templateIdNameTuples = new List<(string, string)>();
        var templates = JArray.Parse(resultJson["result"].ToString());
        foreach (var template in templates)
        {
            templateIdNameTuples.Add((template["name"].ToString(), template["id"].ToString()));
        }

        return templateIdNameTuples;
    }

    private void HandleFailedResponse(Response response)
    {
        var result = response.Body.ReadAsStringAsync().Result;

        Console.WriteLine(response.StatusCode);
        Console.WriteLine(result);
        Console.WriteLine(response.Headers.ToString());

        throw new Exception($"API call failed with code {response.StatusCode}");
    }
}
and update ListTemplatesCommand.cs file with the code below:
using CliFx;
using CliFx.Attributes;
using CliFx.Infrastructure;
using ConsoleTables;
using DynamicTemplateManager.Cli.Services.Impl;
using DynamicTemplateManager.Cli.Services.Interfaces;

namespace DynamicTemplateManager.Cli.Commands.TemplateCommands;

[Command("list-templates")]
public class ListTemplatesCommand : SendGridCommandBase, ICommand
{
    private readonly IDynamicTemplateService _dynamicTemplateService;

    public ListTemplatesCommand(IDynamicTemplateService dynamicTemplateService)
    {
        _dynamicTemplateService = dynamicTemplateService;
    }

    public ValueTask ExecuteAsync(IConsole console)
    {
        var templates = _dynamicTemplateService.ListTemplates(SendGridApiKey).Result;

        var table = new ConsoleTable("Template Name", "Template Id");

        foreach (var templateIdNameTuple in templates)
        {
            table.AddRow(templateIdNameTuple.Item1, templateIdNameTuple.Item2);
        }

        console.Output.Write(table.ToString());

        return default;
    }
}
Before you test the code, update the SENDGRID_API_KEY environment variable with the actual value:
export SENDGRID_API_KEY={ YOUR SENDGRID API KEY }
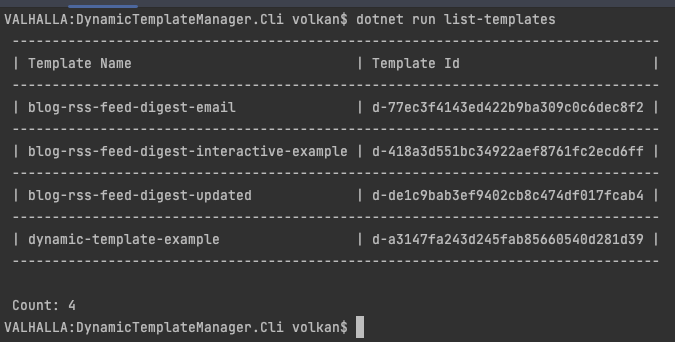
To test the code, run the list-templates command as shown below:
dotnet run list-templates
If all went well, you should see a successful result (an empty table is also a successful result) like this:
If you are getting errors, you can compare your code to the finished version at this stage by checking out the branch:
git checkout 02-sendgrid-commands
git pull
To recap, you implemented your first CLI command by creating a class that implements the ICommand interface that comes with the CliFx library and decorating it with [Command(“command name”)] decorator.
Also, you implemented DynamicTemplateService, which will act as our SendGrid client to manage dynamic email templates.
Finally, you amended the original program setup to use dependency injection to instantiate commands and services.
Now you can move on to the details of Dynamic Template Service to get into SendGrid Dynamic Template API details.
Refactor DynamicTemplateService
Before diving into the API details, refactor the application a bit so it’s simplified.
Now that you’re using dependency injection, you can also read the environment variables at the start-up:
using IHost host = Host.CreateDefaultBuilder(args)
    .ConfigureServices((hostBuilderContext, services) => services
        // Register services
        .AddTransient<IDynamicTemplateService, DynamicTemplateService>()

        // Register commands
        .AddTransient<ListTemplatesCommand>()

        // Configure settings
        .Configure<SendGridSettings>(hostBuilderContext.Configuration.GetSection("SendGridSettings"))
    )
    .Build();
So that we can have SendGridSettings injected into the DynamicTemplateService:
private readonly SendGridSettings _sendGridSettings;

public DynamicTemplateService(IOptions<SendGridSettings> sendGridSettings)
{
    _sendGridSettings = sendGridSettings.Value;
}

public async Task<List<(string, string)>> ListTemplates()
{
    var sendGridClient = new SendGridClient(_sendGridSettings.ApiKey);
// ...
This way, you don’t need SendGridCommandBase.cs. Delete it from the project and remove its reference from the ListTemplatesCommand class:
public class ListTemplatesCommand : ICommand
Since you are no longer passing the API key to the ListTemplates method, you can also simplify the interface as follows:
Task<List<(string, string)>> ListTemplates();
After refactoring, rerun the project and ensure the list-templates command still works.
Before moving on to implementing the CLI commands, there is one more refactoring you should do: Inject SendGridClient using dependency injection and SendGrid.Extensions.DependencyInjection library.
First, run the following command to install the library:
dotnet add package SendGrid.Extensions.DependencyInjection
Update constructing the builder section in Program.cs as below:
using IHost host = Host.CreateDefaultBuilder(args)
    .ConfigureServices((hostBuilderContext, services) => services
        // Register services
        .AddTransient<IDynamicTemplateService, DynamicTemplateService>()

        // Register commands
        .AddTransient<ListTemplatesCommand>()

        // Register SendGridClient
        .AddSendGrid(options => options.ApiKey = hostBuilderContext.Configuration["SendGridSettings:ApiKey"])
    )
    .Build();
Notice how we don’t need to read the ApiKey and pass it on to the DynamicTemplateService anymore. It’s handled when the SendGridClient is instantiated. So go ahead and remove the Configuration folder and SendGridSettings class inside it.
Update DynamicTemplateService.cs constructor and variable initialization section with the code below:
private readonly ISendGridClient _sendGridClient;

public DynamicTemplateService(ISendGridClient sendGridClient)
{
    _sendGridClient = sendGridClient;
}
Now you can remove all the manual SendGridClient instantiations and replace them with the private variable, such as this:
public async Task<List<(string, string)>> ListTemplates()
{
    var queryParams = @"{
        'generations': 'dynamic',
        'page_size': 100
    }";

    var response = await _sendGridClient.RequestAsync(
        method: SendGridClient.Method.GET,
        urlPath: "templates",
        queryParams: queryParams
    );
// ...
Notice in line 8 _sendGridClient is used now. Repeat this replacement in all the methods.
This way, the code is more concise. Finally, rerun the application and confirm the list-templates command still works.
You can get the latest version of the code up until this point by checking out 03-dynamic-template-service by running the following command:
git checkout 03-dynamic-template-service
git pull
Implement all API Calls for Dynamic Template Manager CLI
Now it’s time to get into the details of the SendGrid API calls. To send requests to the SendGrid API, you can use the RequestAsync method on the SendGridClient class. Depending on the operation, you need to provide the HTTP method, endpoint URL, request body and query params.
List Templates
You already implemented the List Templates command in the previous section, so first, let’s look at the API call behind that command:
var queryParams = @"{
    'generations': 'dynamic',
    'page_size': 100
}";

var response = await _sendGridClient.RequestAsync(
    method: SendGridClient.Method.GET,
    urlPath: "templates",
    queryParams: queryParams
);
Create Template
To create a new template, you need to send a POST request to the templates endpoint.
The following snippet shows the data and API call to create a new template:
var data = new
{
    name = templateName,
    generation = "dynamic"
};

var response = await _sendGridClient.RequestAsync(
    method: SendGridClient.Method.POST,
    urlPath: "templates",
    requestBody: JsonConvert.SerializeObject(data)
);
The default value of the generation parameter is legacy, so make sure you set this value to dynamic to ensure the template supports dynamic replacement.
Update Template
You can only update the template’s name once it’s been created. You can do this by sending a PATCH request to the templates/{templateId} endpoint:
var data = new
{
    name = templateName,
};

var response = await _sendGridClient.RequestAsync(
    method: SendGridClient.Method.PATCH,
    urlPath: $"templates/{templateId}",
    requestBody: JsonConvert.SerializeObject(data)
);
Delete Template
Deleting the template is very similar to getting the template details. You send a request to the templates/{templateId} endpoint. The difference is you use the DELETE HTTP method, as shown in the snippet below:
var response = await _sendGridClient.RequestAsync(
    method: SendGridClient.Method.DELETE,
    urlPath: $"templates/{templateId}"
);
Duplicate Template
You send a POST request to the templates/{templateId} endpoint to duplicate an existing template. You also provide the new name of the duplicated template as shown below:
var data = new
{
    name = templateName
};

var response = await _sendGridClient.RequestAsync(
    method: SendGridClient.Method.POST,
    urlPath: $"templates/{templateId}",
    requestBody: JsonConvert.SerializeObject(data)
);
List Versions
To get the version of a specific template, you send a GET request to the templates/{templateId} endpoint, where you provide the template id as shown below:
var response = await _sendGridClient.RequestAsync(
    method: SendGridClient.Method.GET,
    urlPath: $"templates/{templateId}"
);
The versions are listed as an array, so you parse with JArray.Parse(). Only names and ids are needed, so only those fields are returned in this example. There are more fields returned by the API, such as whether or not the version is active and the last time it was updated.
Create Version
You can create a new version by sending a POST request to the “templates/{templateId}/versions” endpoint:
var data = new
{
    template_id = templateId,
    active = 1,
    name = versionName,
    html_content = htmltemplateData,
    generate_plain_content = false,
    subject = "",
    editor = "code"
};

var response = await _sendGridClient.RequestAsync(
    method: SendGridClient.Method.POST,
    urlPath: $"templates/{templateId}/versions",
    requestBody: JsonConvert.SerializeObject(data)
);
The request generation is similar to creating a template that you saw earlier. The main difference is the endpoint. This request is sent to the templates/{templateId}/versions endpoint, where the template id is the id of your template.
Another difference is that you read the complete HTML data from the file and send it to the SendGrid API as our template. Also, note that we set the code value to the editor property. You also make the version active by setting the active property to 1.
Update Version
When you make changes to your template HTML, you don’t need to keep creating new versions. You can update an existing version with your updated HTML. The code below sends the request to update an existing template:
var data = new
{
    template_id = templateId,
    active = 1,
    name = versionName,
    html_content = htmltemplateData,
    generate_plain_content = false,
    subject = ""
};

var response = await _sendGridClient.RequestAsync(
    method: SendGridClient.Method.PATCH,
    urlPath: $"templates/{templateId}/versions/{versionId}",
    requestBody: JsonConvert.SerializeObject(data)
);
You specify the template and version ids in the endpoint URL: “templates/{templateId}/versions/{versionId}”
Other than the endpoint, it looks like creating a new version. However, there is one key difference: the editor property.
Notice in the code above that you don’t set editor. If you set it to code just like creating a new version, you get the following error:
You cannot switch editors once a dynamic template version has been created.
Even if you specify the same value, it still gives this error, so it looks like it doesn’t check what the original value is. In the end, changing the editor when updating the version is not supported. So as soon as the API sees this value in the request, it rejects it.
Delete Version
You can also delete a version by sending a GET request to the templates/{templateId}/versions/{versionId} endpoint as shown below:
var response = await _sendGridClient.RequestAsync(
    method: SendGridClient.Method.DELETE,
    urlPath: $"templates/{templateId}/versions/{versionId}"
);
More On Transactional Templates API
The sample project and this article show how to use some API endpoints to manage your dynamic email templates. Please check out the official API documentation to learn more about all the operations supported by the SendGrid API.
Implement all CLI Commands
By this point, you have a good understanding of how a CLI command is implemented. For example, the list-templates command does not require parameters. However, some commands do need parameters. For example, if you want to list the versions of a template, you need to pass the template id to the SendGrid API. You can achieve this with the current setup, but you would have to copy/paste the template id from the list-templates command output every time. Alternatively, you can go to the SendGrid dashboard and find your template id there, but there is always an extra step involved.
This is where Sharprompt comes in. It is a library to make your CLI interactive. This way, we can display all the templates in your account and pass the selected template’s id to the SendGrid API. This approach eliminates the need to copy/paste the id from another source, making your CLI more user-friendly.
First, install the library:
dotnet add package Sharprompt
Under the TemplateCommands folder, add a new file called ListVersionsCommand.cs and replace the contents with the code below:
using CliFx;
using CliFx.Attributes;
using CliFx.Infrastructure;
using ConsoleTables;
using DynamicTemplateManager.Cli.Services.Interfaces;
using Sharprompt;
namespace DynamicTemplateManager.Cli.Commands.TemplateCommands;
[Command("list-versions")]
public class ListVersionsCommand : ICommand
{
private readonly IDynamicTemplateService _dynamicTemplateService;
public ListVersionsCommand(IDynamicTemplateService dynamicTemplateService)
{
_dynamicTemplateService = dynamicTemplateService;
}
public ValueTask ExecuteAsync(IConsole console)
{
var templates = _dynamicTemplateService.ListTemplates().Result;
if (templates.Count == 0)
{
throw new ArgumentException("No available templates. Please create a template first.");
}
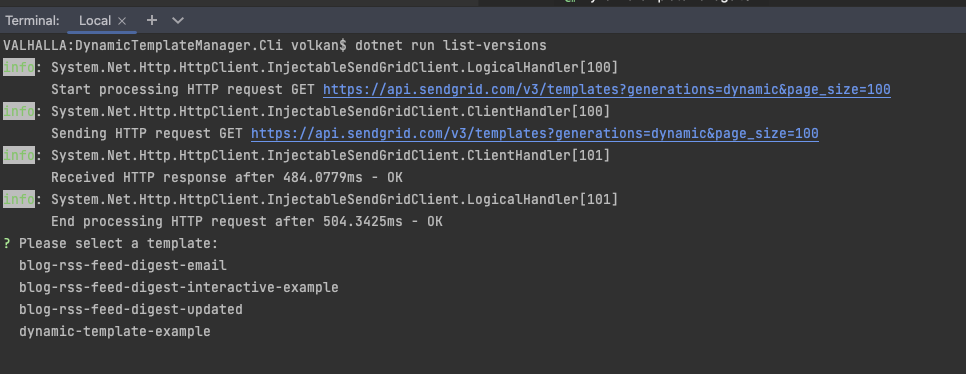
var templateName = Prompt.Select("Please select a template", templates.Select(t => t.Item1).OrderBy(t => t).ToList());
var templateId = templates.First(t => t.Item1 == templateName).Item2;
var versions = _dynamicTemplateService.ListVersions(templateId).Result;
var table = new ConsoleTable("Template Name", "Version Name", "Version Id");
foreach (var versionIdNameTuple in templates)
{
table.AddRow(templateName, versionIdNameTuple.Item1, versionIdNameTuple.Item2);
}
console.Output.WriteLine(table.ToString());
return default;
}
}
Notice on line 28 you are prompting the user to select one of the existing templates. When you run the application, the output should look like this:
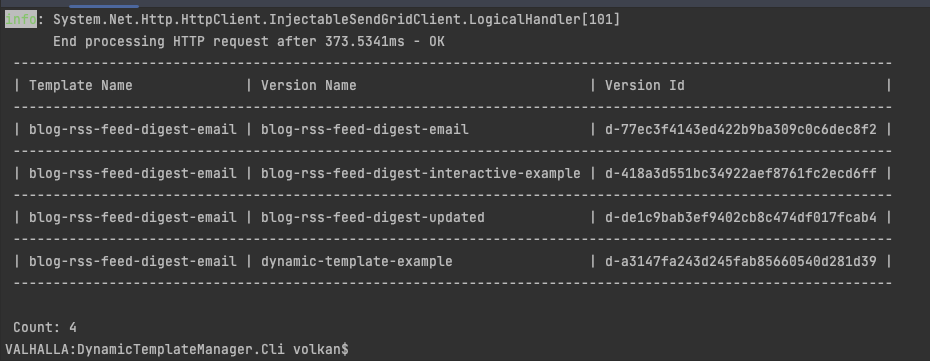
After you’ve chosen a template, it should fetch the versions of that template and display them in a table:
The rest of the commands follow a similar pattern. You can check out the branch 04-cli-commands to get the code so far:
git checkout 04-cli-commands
git pull
Now, bring it home and update your installed CLI so you can run it anywhere in a terminal window. Run the following commands to get the final version of the project and update the installed tool:
git checkout main
git pull
dotnet pack
dotnet tool update --global --add-source ./nupkg DynamicTemplateManager.Cli
Next, open a new terminal and run the following command to see the available commands:
Your output should look like this:
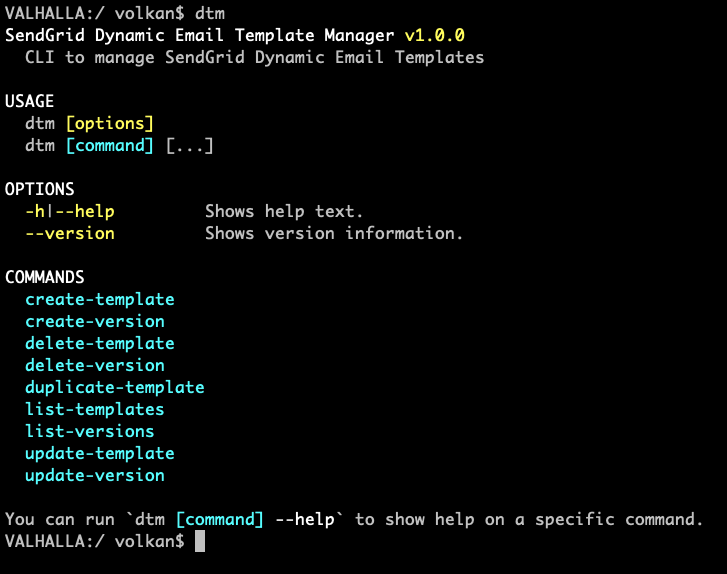
You can now use your CLI to manage your templates 🎉.
Conclusion
Congratulations! You’ve made it this far, which means you implemented a complete interactive CLI to manage your SendGrid Dynamic Email Templates. In addition, you learned how to use CliFx and Sharprompt libraries and the dotnet tool to install and update your CLI.
I hope you enjoyed this tutorial as much as I enjoyed writing it.
Resources