-->

dev javascript

Any developer who wrote any JavaScript code must have used the console.log() method at some point to log informational messages or for print debugging. However, while that method is quite useful, it is not the only one in our arsenal. So let’s look at some useful methods that are not very commonly known to most developers.

time() / timeLog() / timeEnd()

If you have some long-running tasks and want to get some insights into how long a task takes, these methods are handy. You can start a timer by calling:

console.time();

and end the timer by calling

console.timeEnd();

You can also pass a label to these methods to make the logs more readable. Otherwise, the times are logged under the “default” label.

timeLog() method can be used anywhere between time and timeEnd to log the timer’s current value.

The example below uses all the features discussed above:

console.time();
for (let i = 0; i < 10000000; i++) {
  if (i === 5000000) {
    console.timeLog();
  }
}
console.timeEnd();

It loops 10 million times and logs the time halfway through (console.timeLog()) and at the end (console.timeEnd())

and the output looks like this:

Output of timeLog function showing the time it took for a loop

table()

This neat little feature can be useful when displaying tabular data. In this example, we are going to get the first ten results from people endpoint on Star Wars API and display them in a table:

fetch ("https://swapi.py4e.com/api/people/")
  .then(data => data.text())
  .then(response => { 
    console.table(JSON.parse(response).results);
  });

Let’s check out the results:
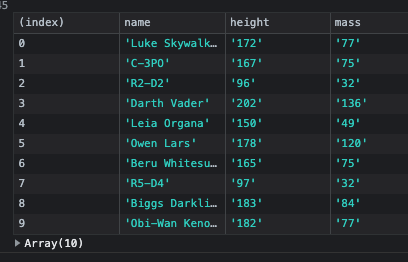
Output of table function call showing Star Wars displayed in a table format

And all it takes is five lines of code to produce this!

warn() / error()

console.log() is fine for logging informational statements, but to make the warning and errors more readable, you can use warn() and error() methods. When checking the console, they stand out among all the other log lines.

For example, the following code:

for (let i = 1; i <= 10; i++) {
  console.log(i);
  if (i === 5) {
    console.warn("warning: half-way through");
  }
}
console.error("error: all gone now");

produces this output:
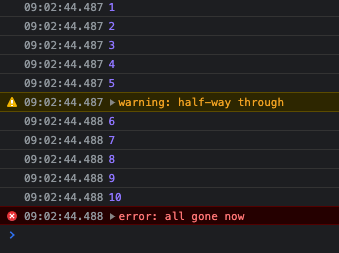
Output of warn and error functions among information lines in the console

debug()

I chose to cover debug in a separate section even though it works very similarly to log(), warn() and error() methods. By default, the log level in browsers is not set to display debug messages.
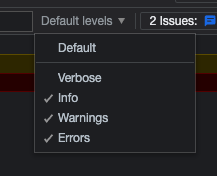
Default debug levels dropdown opened showing all levels selected except Verbose

So if we run the previous example with log() call replaced by debug() call, the output looks very simplified:

for (let i = 1; i <= 10; i++) {
  console.debug(i);
  if (i === 5) {
    console.warn("warning: half-way through");
  }
}
console.error("error: all gone now");

Output with debugging:

Output showing only warn and error outputs when Verbose is de-selected

If we want to see all the statements, we need to explicitly set the logging level to verbose and get the same results as before.
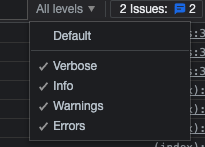
Debug levels dropdown expanded and showing all levels selected

group() / groupEnd() / groupCollapsed()

group() and groupEnd() let us create indented log entries within a group label.

For example, the following code

console.group("Group 1");
console.log("entry 1");
console.log("entry 2");
console.log("entry 3");
console.groupEnd("Group 1");

console.group("Group 2");
console.log("entry 1");
console.log("entry 2");
console.log("entry 3");
console.groupEnd("Group 2");

produces this result:
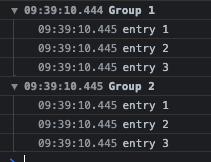
group and groupEnd function output

We can also create log entries in a collapsed state so that they can only be viewed when we explicitly expand the log group:

console.group("Group 1");
console.log("entry 1");
console.log("entry 2");
console.log("entry 3");
console.groupCollapsed("Hidden stuff until you expand");
console.log("Hidden entry 1");
console.log("Hidden entry 2");
console.groupEnd("Group 1");

By default, the output looks like this:
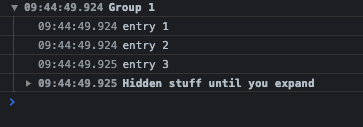
group, groupCollapsed and groupEnd function call output. Some lines are shown as collapsed.

To see the contents of the collapsed group, we need to expand it explicitly:
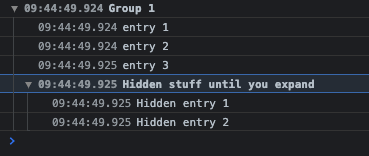
Collapsed lines are expanded to show the originally hidden lines

Conclusion

This post looked into useful Console API methods that are not commonly known. To ensure compatibility, we didn’t look into non-standard methods such as timeStamp() and profile(). Instead, I’d recommend visiting the resources below and looking into all the methods. Some of them are not covered here but might be valuable to you.
Resources

dev dotnet

Command-Line Interfaces (CLI) are invaluable tools for a developer. We use them daily to interact with AWS, Docker, GitHub, dotnet etc. We can develop scripts based on CLI commands to carry out complex tasks. In this post, we are going to develop a CLI for ourselves. Let’s get started!

Getting Started

We are going to use two things:

  • dotnet tool command
  • a very handy NuGet package called CliFx

dotnet tool

The simplest way to describe a dotnet tool is a console application distributed as a NuGet package.

Usually, when you go to a NuGet source site such as Nuget.org, you deal with class libraries. You download the class library and consume it in your application.

Similarly, you can publish your console application as a dotnet tool in NuGet package format. This allows installing applications by simply using dotnet CLI, such as:

dotnet tool install --global --add-source {PACKAGE PATH} {PACKAGE NAME}

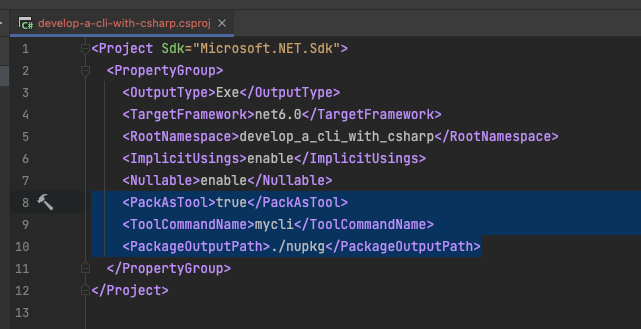
To achieve that, all we have to do is create a new console application and modify the csproj file by adding the following lines:

<PackAsTool>true</PackAsTool>
<ToolCommandName>{ COMMAND NAME }</ToolCommandName>
<PackageOutputPath>./nupkg</PackageOutputPath>

Now let’s have a walkthrough and see it in action:

  1. Create a console application using dotnet CLI:
dotnet new console
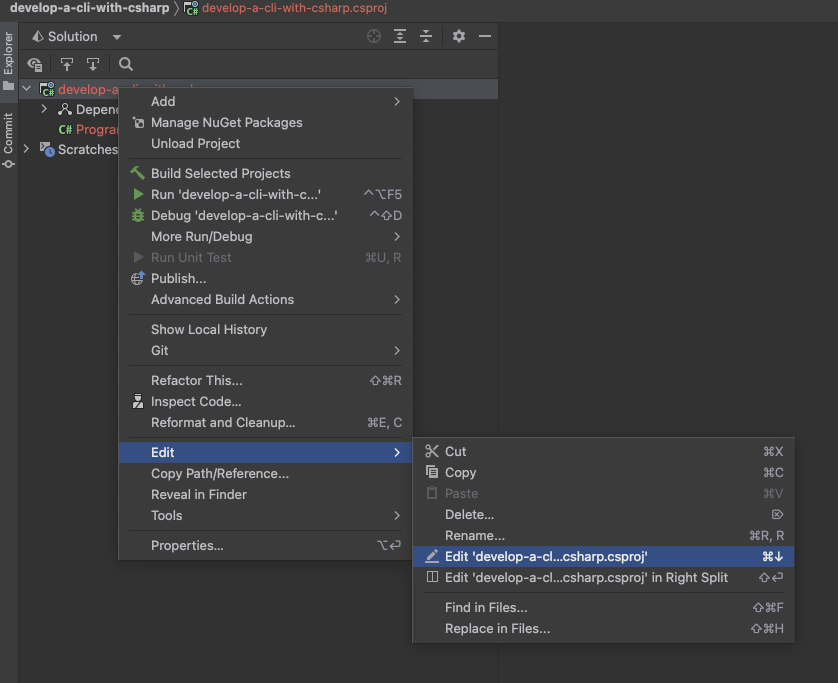
  1. Edit the csproj file. In this example, I’m going to use JetBrains Rider IDE to edit, but you can use any IDE/text editor you want:

Rider IDE showing Edit menu expanded and Edit .csproj file selected

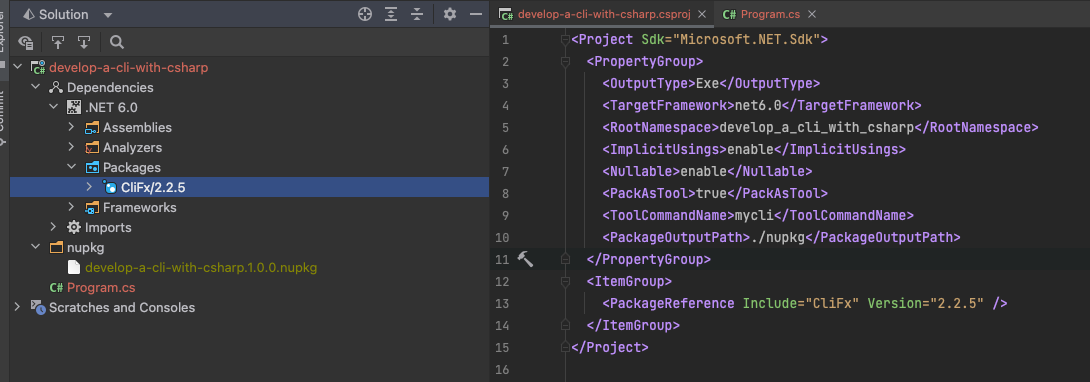
  1. Add the following lines inside the PropertyGroup element so that it looks something like this:

IDE showing .csproj file edited and new XML lines added

  1. Run the following command to create the NuGet package:
dotnet pack

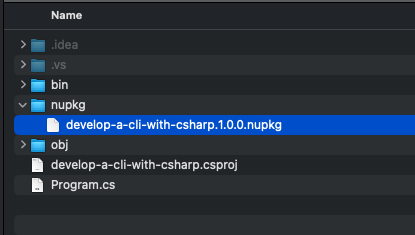
Finder window showing NuGet package created as output of dotnet pack command

  1. Install it globally on your computer by running the following command:
dotnet tool install --global --add-source ./nupkg develop-a-cli-with-csharp

Please note the last argument is the name of the root namespace, not the name of the CLI we are creating.

  1. Now you can test the tool simply by running the name of the tool in the terminal:
mycli

and the output should look like this:

Terminal window showing output of mycli command

Great! We have our tool installed nicely on the computer. We can run it anywhere in the terminal (regardless of the path we are in). But there is more to a CLI than simply executing a console application. The most important of a CLI is to have commands and subcommands. For example, when we use the dotnet CLI, we enter the following command:

dotnet tool install --global --add-source ./nupkg develop-a-cli-with-csharp

In this example,

  • dotnet is the name of the CLI
  • tool is the command
  • install is the subcommand
  • The rest are arguments passed to the subcommand

We don’t have any mechanism to understand commands, subcommands and arguments. This is where CliFx comes in.

CliFx

CliFx is a simple to use NuGet package that adds the full capabilities of a CLI to our console application.

  1. Let’s start with installing the package:
dotnet add package CliFx

You should be able to see the package after running the command above:

Rider IDE showing CliFx package added to the project

  1. Replace the Main method with the following code:
using CliFx;

public static class Program
{
    public static async Task<int> Main() =>
        await new CliApplicationBuilder()
            .AddCommandsFromThisAssembly()
            .SetExecutableName("mycli")
            .SetTitle("My CLI")
            .SetDescription("A useful CLI tool to demo")
            .Build()
            .RunAsync();
}
  1. Now, let’s create our commands by creating two new classes: HelloCommand and WorldCommand. They should look like the below:
using CliFx;

public static class Program
{
    public static async Task<int> Main() =>
        await new CliApplicationBuilder()
            .AddCommandsFromThisAssembly()
            .SetExecutableName("mycli")
            .SetTitle("My CLI")
            .SetDescription("A useful CLI tool to demo")
            .Build()
            .RunAsync();
}
[Command("hello world")]
public class WorldCommand : ICommand
{
    public ValueTask ExecuteAsync(IConsole console)
    {
        console.Output.WriteLine("Hello, World!");
        return default;
    }
}
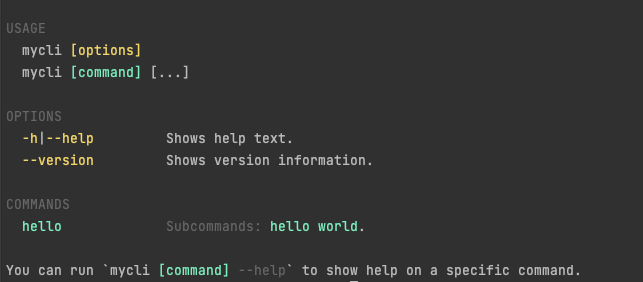
  1. Now run the application in the terminal without any parameters. You should get a nice help output:

Terminal window showing the output of mycli command. Only hello command is shown.

  1. Test the command and subcommand by running the following commands:
dotnet run -- hello
dotnet run -- hello world

The output should look like this:

Terminal window showing application output showing hello and hello world commands executed

Notice that by running the “hello” command, we are executing the ExecuteAsync method in HelloCommand class. WorldCommand is a subcommand of the hello command, so we can execute a different method by running “hello world”.

At this point, our installed tool is not affected by these changes. So we have to pack and update our tool now by running the following commands:

dotnet pack
dotnet tool update --global --add-source ./nupkg develop-a-cli-with-csharp

You can confirm the tool is updated by looking for output like this:

Terminal window showing the output of dotnet tool update command

  1. Finally, open another terminal window and type the CLI name
mycli

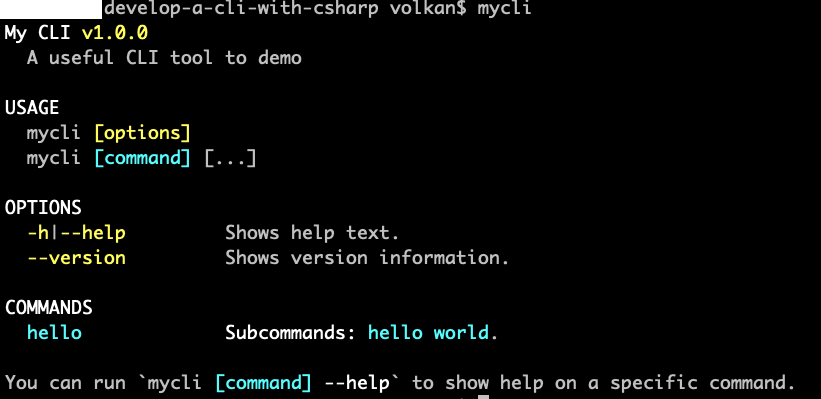
and you should see the new help output listing the available commands in the CLI:

Terminal window showing the output of mycli command running as a CLI

Conclusion

CLIs are handy tools for developers. In this post, we looked into creating a CLI capable of creating commands and subcommands. It can also be installed as a dotnet tool and distributed as a NuGet package.

Resources

dev dotnet, rss

When you listen to a podcast, your podcast player downloads the RSS feed of the publisher. Then, it checks the locally downloaded files and downloads the new ones as they come along. In this small project, I will develop a small C# application that downloads the entire media from an RSS feed.

All the information in the RSS feed is public, and all RSS clients download these media files.

Here’s how the program works in a nutshell:

  • It accepts two arguments: the URL of the RSS feed and the target directory to save the files into
  • It then downloads the RSS feed into a temporary XML file
  • It parses the XML and gets the following values: Title, publication date and the URL to download
  • It loops through all the entries in the feed and saves the files to the local file system (It skips existing files so you can run it multiple times, and it won’t re-download unnecessarily)
  • Finally, it deletes the temp XML file

That’s all! Not a fancy podcatcher; it’s a fun little project you can use to archive your favourite podcasts.

The entire source code for the C# Console Application is below. Enjoy!

using System.Xml;
using System.Net;

string feedUrl = args[0];
string feedLocalFileNnme = "temp-feed.xml";

string targetLocalDirectory = args[1].TrimEnd('/');

using (var client = new WebClient())
{
    Console.WriteLine($"Downloading {feedUrl} to {feedLocalFileNnme}");
    client.DownloadFile(feedUrl, feedLocalFileNnme);
}

string rawXml = File.ReadAllText(feedLocalFileNnme);
var xmlDocument = new XmlDocument();
xmlDocument.LoadXml(rawXml);

XmlNodeList itemNodeList = xmlDocument.SelectNodes("/rss/channel/item");

for (int i = 0; i < itemNodeList.Count; i++)
{
    XmlNode titleNode = itemNodeList[i].SelectNodes("title")[0];
    XmlNode enclosureNode = itemNodeList[i].SelectNodes("enclosure")[0];
    XmlNode pubDateNode = itemNodeList[i].SelectNodes("pubDate")[0];
    string urlToDownload = enclosureNode.Attributes["url"].Value;
    DateTime pubDate = DateTime.Parse(pubDateNode.InnerText);
    string localFileName = $"{targetLocalDirectory}/{GetDate(pubDate)}-{titleNode.InnerText}.mp3";
    if (!File.Exists(localFileName))
    {
        using (var client = new WebClient())
        {
            Console.WriteLine($"Downloading {urlToDownload} to {localFileName}");
            client.DownloadFile(urlToDownload, localFileName);
            Thread.Sleep(2000);
        }
    }
    else
    {
        Console.WriteLine($"Skipping. File at {localFileName} already exists.");
    }
    
    string GetDate(DateTime pubDate)
    {
        return $"{pubDate.Year}-{pubDate.Month.ToString().PadLeft(2, '0')}-{pubDate.Day.ToString().PadLeft(2, '0')}";
    }
}

File.Delete(feedLocalFileNnme);

Usage

dotnet run -- {RSS URL} {Target Local Directory}

Resources