-->

dev aws, lex, chatbot, sms, twilio

This article was originally published on the Twilio Blog.

Customer service is an integral part of any business. Today, people expect speed and convenience from customer services when they need to get answers. Twilio already has built-in solutions to improve customer service. In addition to that, you can implement your chatbot with Amazon Lex and integrate it with Twilio SMS so that your customers can interact with your bot easily using SMS. In this article, you will learn how to achieve this.

Prerequisites

You’ll need the following things in this tutorial:

What is Amazon Lex?

Amazon Lex is an artificial intelligence service that allows developers to create voice or text-based conversational interfaces. This service powers Amazon’s own Alexa.

Lex provides automatic speech recognition and natural language understanding technologies. It takes the user’s input, runs it through a Natural Language Processing (NLP) engine and determines the user’s intent. The value of this is the user does not need to remember a set of commands to interact with your bot. They can talk to the bot just like they would to a human being.

Create your Chatbot

Go to Lex dashboard and click the Create bot button.

In this article, you will use one of the demo bots that LexV2 comes with, as it is sufficient to illustrate how to connect a Lex chatbot to Twilio SMS.

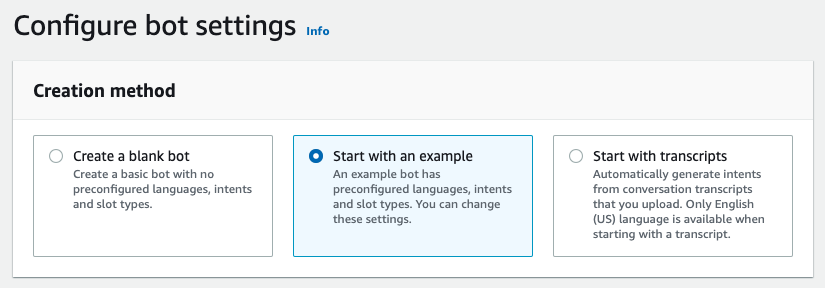
In the Configure bot settings page, click Start with an example.

Create an SMS chatbot using Amazon Lex and Twilio SMS - image 1

In the Example bots section, select BookTrip.

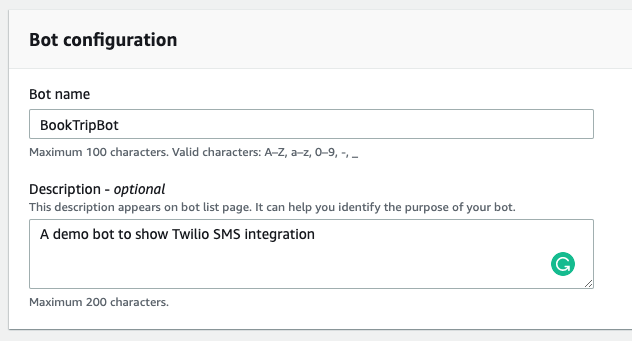
In the Bot configuration section, enter BookTripBot as the name. You can enter a description if you like.

Create an SMS chatbot using Amazon Lex and Twilio SMS - image 2

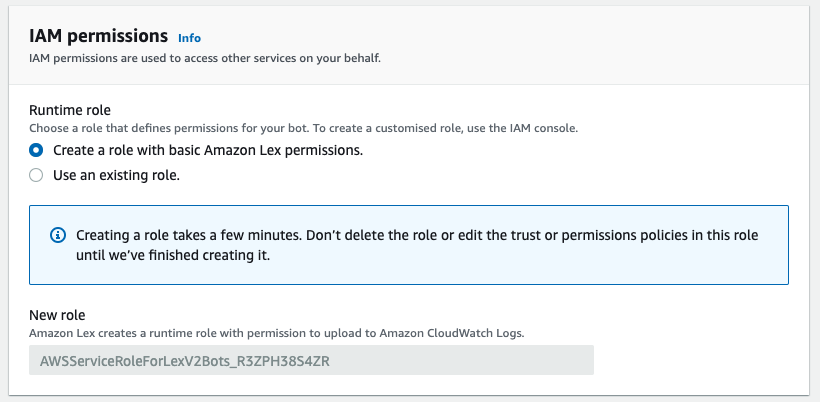
In IAM permissions, select Create a role with basic Amazon Lex permissions. AWS will generate the role name for you, so you don’t have to set the name.

Create an SMS chatbot using Amazon Lex and Twilio SMS - image 3

In the Children’s Online Privacy Protection Act (COPPA) section, select No. This only applies if you collect information from children under 13 therefore, it doesn’t apply to your demo project.

Leave the remaining settings with their default values and click the Next button.

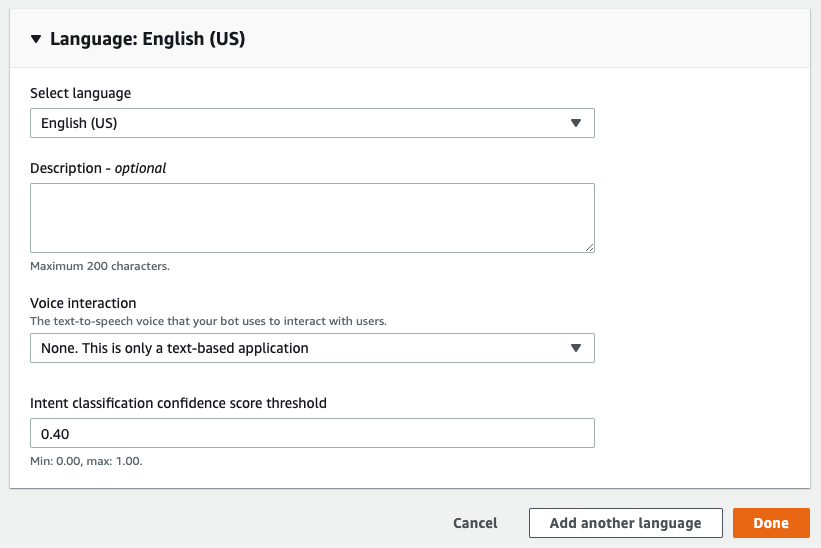
In the next section, you can choose to add multiple languages. The supported language and locale list can be found here. You can even assign a different voice to each language. In this project, you will use SMS-based interaction, so select “None. This is only a text-based application” in the Voice interaction dropdown list.

Leave the default for the score threshold and click Done.

Create an SMS chatbot using Amazon Lex and Twilio SMS - image 4

After the bot creation, Lex takes you to the intent list. An intent is an action your bot takes to fulfil a user’s request. It’s different from traditional command-based interactions, where you need to know the exact command and the order of arguments. In this model, you interact with the bot just like you would talk to a human being. Your input is put through an NLP engine to determine your intent.

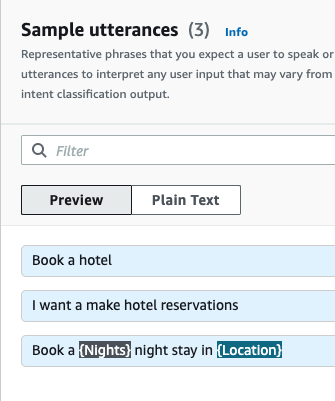
Scroll down to the Sample utterances section. You can see the same intent is expressed in multiple ways as humans do in a normal conversation.

Create an SMS chatbot using Amazon Lex and Twilio SMS - image 5

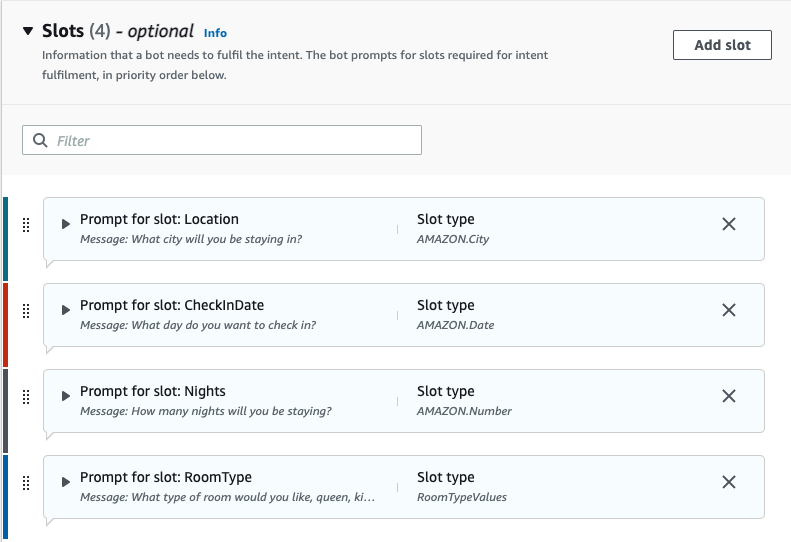
{Nights} and {Location} shown in the third utterance are called slots. Scroll down to the Slots section to see how they are defined.

Create an SMS chatbot using Amazon Lex and Twilio SMS - image 6

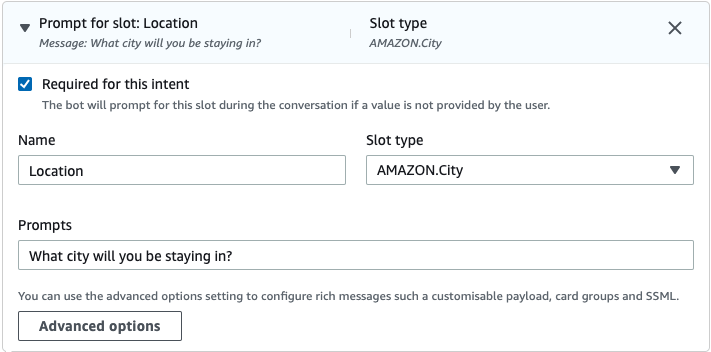
A slot is another important concept. As you can see in the utterances, some of the slots are used as placeholders and can be extracted from the utterance to fill those values. A slot can be defined as required, which is the case here. Expand the Location panel to see the details:

Create an SMS chatbot using Amazon Lex and Twilio SMS - image 7

This slot is marked as required, meaning that if the user does not supply this value, Lex will keep asking it until it fills the slot. The question it will ask is determined by the phrase you put in the Prompts field (“What city will you be staying in?” In this example).

Another thing to note is the data type. This slot has the AMAZON.City built-in slot type. It’s not a free-form string field. Amazon provides these built-in slot types. These are pre-defined models that are trained by Amazon.

You can also create your custom slot types as you can see in the RoomType slot, which has a custom RoomTypeValues slot type.

Click the Save Intent button

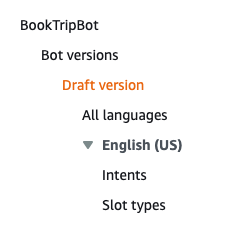
Scroll to the top and click Language: English (US) link in the breadcrumb. On the left pane, you should see two links under the language: Intents and Slot types.

Create an SMS chatbot using Amazon Lex and Twilio SMS - image 8

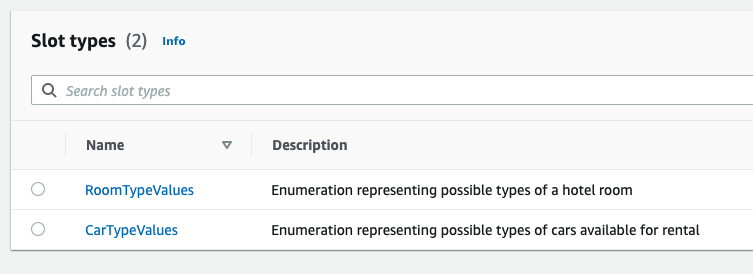
You looked into intents; now click the Slot types link to see how the custom types are defined. For this example bot, Amazon defined two custom slots:

Create an SMS chatbot using Amazon Lex and Twilio SMS - image 9

Click RoomTypeValues.

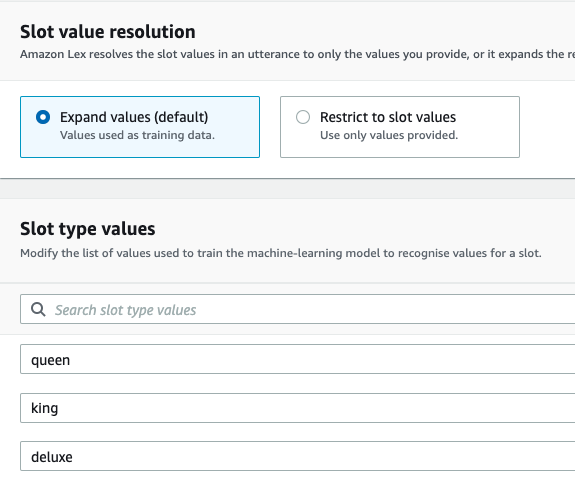
Create an SMS chatbot using Amazon Lex and Twilio SMS - image 10

The default value resolution method is Expand values which is the one used in this example. This way, you are not providing a closed set of values but rather a sample dataset to train your machine learning model.

Lex performs better when you train your models with comprehensive values for your slots and utterances.

Click the Build button at the top of the screen.

After a show while, you should get a Successfully built notification.

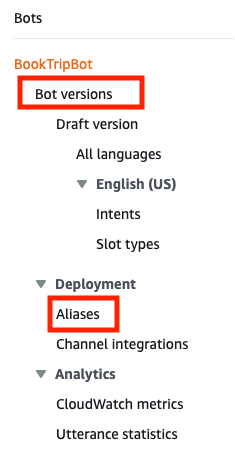
Dismiss the notification and click the Bot: BookTripBot link in the breadcrumb. Take a look at the left pane again and note two important concepts: Versions and Aliases.

Create an SMS chatbot using Amazon Lex and Twilio SMS - image 11

Currently, you are on the Draft version. The draft version is the work-in-progress version of your bot. When you want your updates to take effect, you have to publish a new numbered version. These are simple integer auto-incremented numbers. They are read-only snapshots of the current state of your bot.

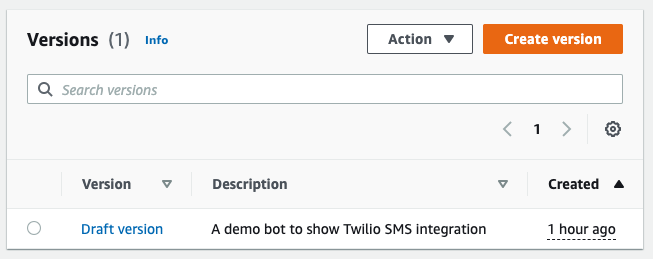
To publish your first version, click the Bot versions link on the left pane, then click the Create version button.

Create an SMS chatbot using Amazon Lex and Twilio SMS - image 12

It’s useful to give a meaningful description as the number of versions grows you tend to forget which feature was released with which version.

Put a description such as “The initial version of the example project with three intents and two slot types” and click the Create button at the bottom of the page.

After a few seconds, you should see your new version in the list.

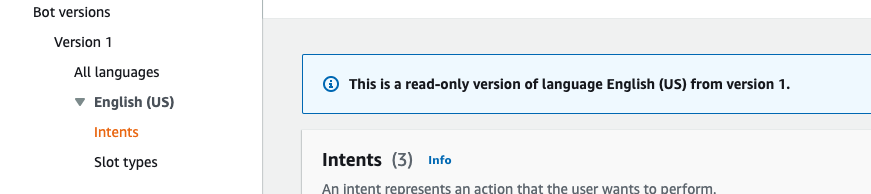
Click Version 1 then Intents. You should a reminder from Amazon saying that this is a read-only version.

Create an SMS chatbot using Amazon Lex and Twilio SMS - image 13

As mentioned above, this is an immutable snapshot of your bot. If you make further changes, you will need to publish a new version. You cannot update existing versions.

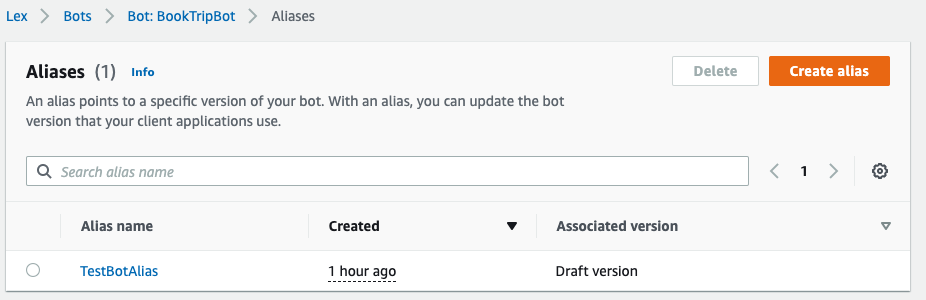
Now click Aliases on the left menu. It should show the default TestBotAlias:

Create an SMS chatbot using Amazon Lex and Twilio SMS - image 14

An alias is associated with a specific version of your bot. The benefit of this is you can have multiple aliases, such as test and live. If you publish a new version, you can point the test alias to the new version. This way, your live alias is not affected until you test your changes. After you’re satisfied your new version is ready to go live, you can simply associate the live version with the new version and all the new requests will come to the new version of your bot. Also, if you experience issues with your latest version, you can simply assign the previous version to your alias to roll back. This kind of separation between the versions and aliases makes change management a lot easier.

Click the Create alias button.

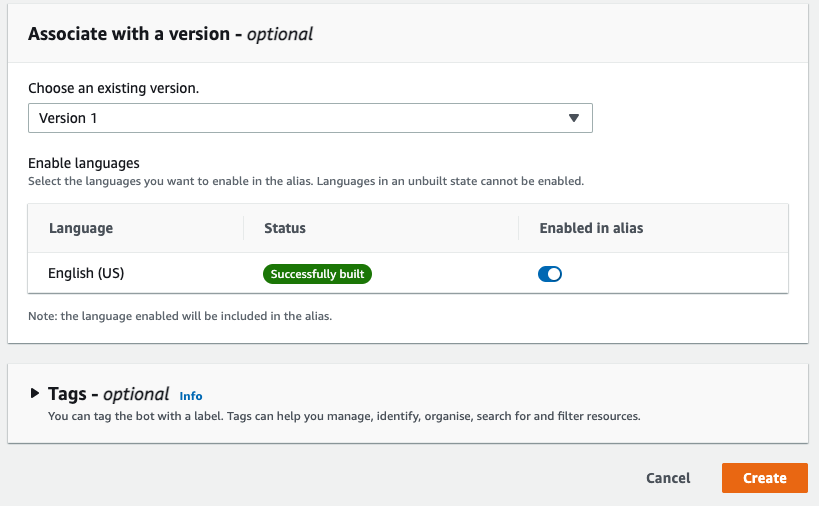
Enter Live as Alias name. In the Associate with a version section, choose Version 1. The language comes already enabled, so leave it like that.

Create an SMS chatbot using Amazon Lex and Twilio SMS - image 15

Click the Create button.

You should see the alias is successfully created and shown in the list.

Now that your bot has been published, move on to the next section to integrate it with Twilio.

Connect your Chatbot to Twilio

Your bot is live, but the users don’t have a way to interact with it.

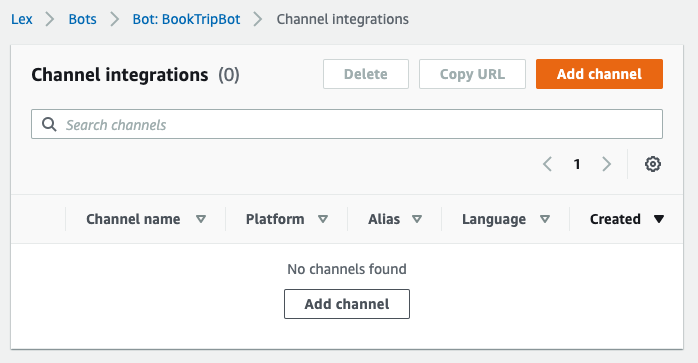
To fix this, click the Channel integrations link on the left menu.

Create an SMS chatbot using Amazon Lex and Twilio SMS - image 16

Click the Add channel button.

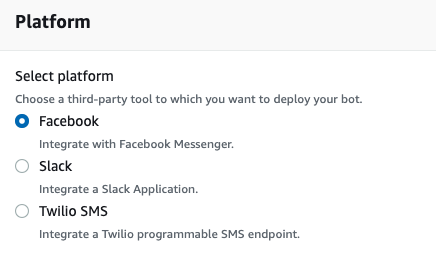
Amazon Lex supports 3 integration platforms: Facebook, Slack, and Twilio SMS.

Create an SMS chatbot using Amazon Lex and Twilio SMS - image 17

Select Twilio SMS.

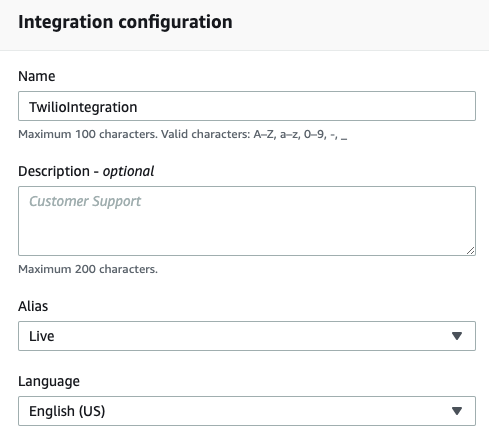
In the Integration configuration section, enter TwilioIntegration as the name, select Live in the Alias list and English (US) in the language list.

Create an SMS chatbot using Amazon Lex and Twilio SMS - image 18

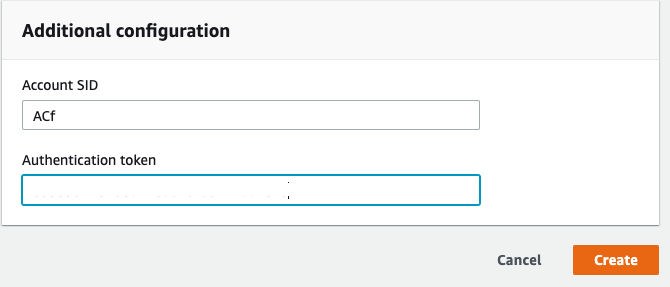
In the Additional configuration section, you will need your Twilio Account SID and Authentication token.

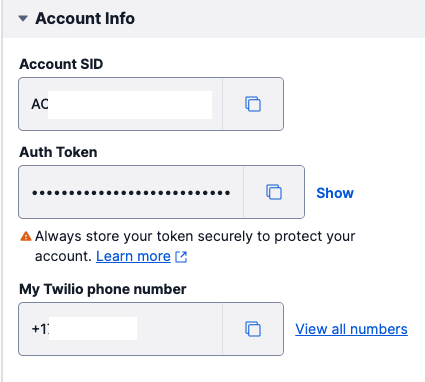
Open the Twilio Console. On the main page, you should see the Account Info section.

Create an SMS chatbot using Amazon Lex and Twilio SMS - image 19

Copy your Account SID and Auth Token values and paste them in the corresponding inputs in the AWS console.

Create an SMS chatbot using Amazon Lex and Twilio SMS - image 20

Click the Create button.

Twilio SMS integration should appear in the list. Click the channel name to view the details.

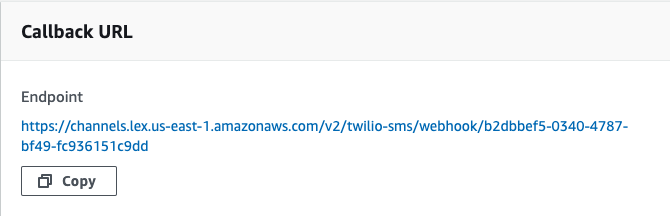
Scroll down to the Callback URL section.

You should see an auto-generated webhook URL that Lex expects Twilio to post data to.

Create an SMS chatbot using Amazon Lex and Twilio SMS - image 21

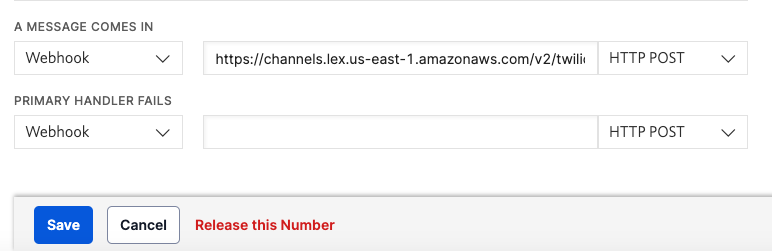
To complete the integration, copy the link and go to the Twilio console. Select your account, and then click Phone Numbers → Manage → Active Numbers on the left pane. (If Phone Numbers isn’t on the left pane, click Explore Products and then on Phone Numbers.)

Click the phone number you want to use for your project and scroll down to the Messaging section.

In the “A MESSAGE COMES IN” section, select Webhook and paste the callback URL into the input field. Select HTTP POST in the next dropdown.

Create an SMS chatbot using Amazon Lex and Twilio SMS - image 22

Click the Save button at the bottom of the screen.

Test your chatbot via SMS

Finally, it’s time to test your chatbot.

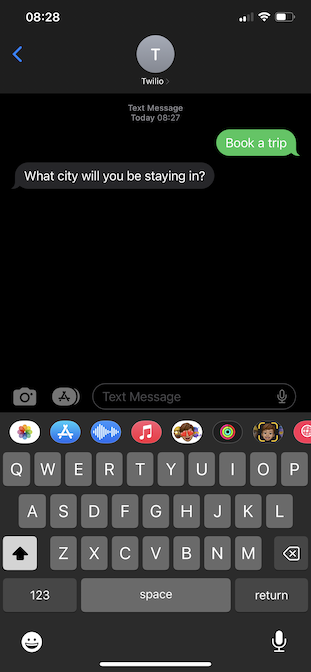
From your phone, send an SMS to your Twilio phone number with the following message: Book a trip.

You should get a response from the bot asking the city.

Create an SMS chatbot using Amazon Lex and Twilio SMS - image 23

Remember this is the prompt message saw earlier and it’s shown now because the City slot is required. Send a city name to your liking and follow the bot’s prompts to complete the booking process.

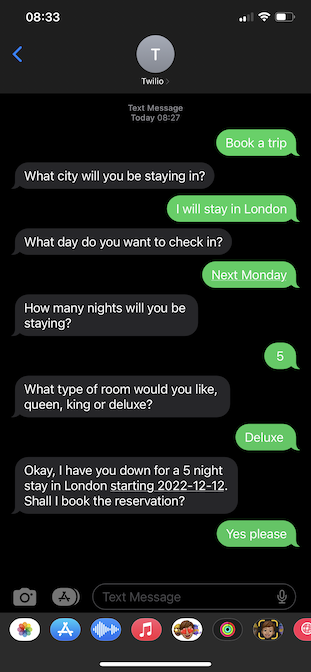
Below is a screenshot of an example conversation:

Create an SMS chatbot using Amazon Lex and Twilio SMS - image 24

To the city question. I responded: “I will stay in London”. My answer was not a single word, but Lex was able to get the city name from the context.

Another thing is I didn’t specify the exact date. I said “Next Monday” yet it was smart enough to understand the date I meant.

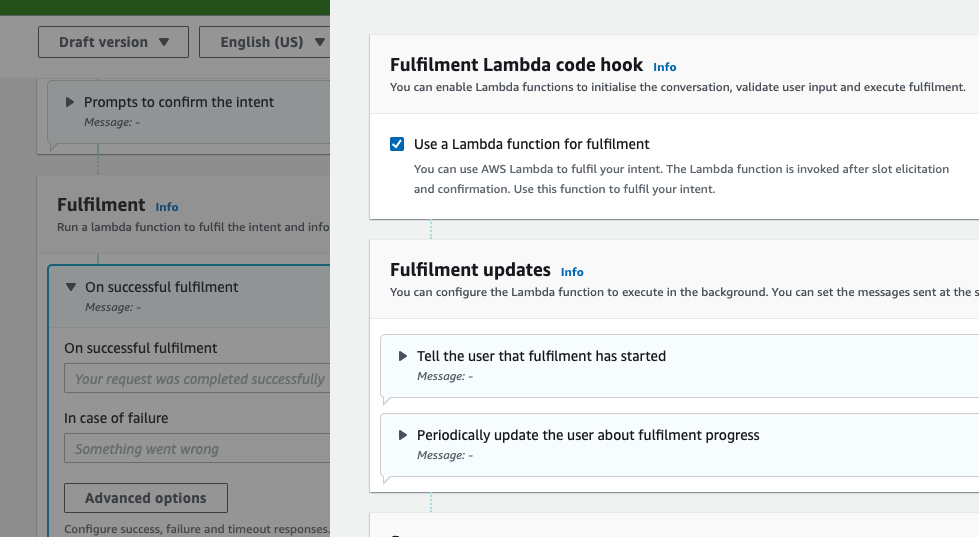
Lex asks these questions without coming to your backend so that when it does post this data to your backend Lambda function, you can rest assured that the heavy lifting was already done and all the variables are already filled in. By default, invoking a Lambda function is not enabled. You can configure this behavior by enabling the fulfillment and ticking the Use a Lambda function for fulfilment checkbox in the Advanced options. You can read more about fulfillment and using Lambda functions on AWS documentation.

Create an SMS chatbot using Amazon Lex and Twilio SMS - image 25

Conclusion

In this tutorial, you learned how to create a chatbot using Amazon’s Lex service. You also created a Twilio SMS integration so that users can interact with your bot via SMS.

Amazon Lex leverages machine learning and captures the user’s intent and the values your program needs. SMS is probably the most ubiquitous client application in the world. Users can interact with your chatbot without having to install anything on their phones. Having these two technologies combined gives you great power to develop smart chatbots.

If you’d like to keep learning, I recommend taking a look at these articles:

dev voice, voicemail, blazor, dotnet, twilio

This article was originally published on the Twilio Blog.

In Part 1 of this series, you implemented a voicemail service that you can manage by calling your own Twilio number. You could then listen to the voice messages and choose to save or delete them. In this article, you will improve your voicemail service by adding a GUI so that you can carry out the same operations via the web and also see more information about the call, such as the caller number, duration and even the transcript of the message. If this sounds interesting to you, let’s get started!

Prerequisites

You’ll need the following things in this tutorial:

Project Overview

The project will start where Part 1 ended. The older version relies on filenames to keep the state of the recordings (new vs saved). In this version, you will introduce a SQLite database to store the metadata such as caller number, call duration, etc.

Project setup

The easiest way to set up the starter project is by cloning the sample GitHub repository.

Open a terminal, change to the directory you want to download the project (on the starter-project branch) and run the following command:

git clone https://github.com/Dev-Power/voicemail-service-with-gui-using-twilio-and-blazor --branch starter-project

Before making any changes, ensure the current version is in working order.

Run the following command to start tunneling:

ngrok http http://localhost:5096

Update the Twilio incoming call webhook URL with the Forwarding URL assigned to you by ngrok, and add the /IncomingCall path. Leave the ngrok tunnel running and open a separate shell for the upcoming commands.

In a new shell, change directories to the web API project.

cd voicemail-service-with-gui-using-twilio-and-blazor/src/VoicemailDirectory.WebApi

To test leaving a voicemail, remove your phone number from the Voicemail:Owners array in

appsettings.json and run the application with the following command:

dotnet run

Call your Twilio phone number, and you should be able to record a message. The saved message should appear under the wwwroot/Voicemails directory.

Update the appsettings.json by adding your number to the owner’s list (using E. 164 formatting) and call your Twilio phone number again.

This time you should be greeted with a message telling you have one new message and no saved messages, followed by the recorded message.

If your project works so far, you’re ready to move on to the next section to refactor and improve. If not, please refer to the original article and make sure your setup works.

Use EF Core and a SQLite database to store metadata

In the first version, you used the filename to store very limited metadata about the recording: Call status, which can be “New” or “Saved”. This was used to order the recordings to play the new ones first.

In this version, you will use a local SQLite database instead. First, start by adding the EF Core SQLite NuGet package to your API project:

dotnet add package Microsoft.EntityFrameworkCore.Sqlite

Create a new directory called Data and add a new C# file under it called RecordingContext.cs. Update the contents as below:

using Microsoft.EntityFrameworkCore;
namespace VoicemailDirectory.WebApi.Data;
public class RecordingContext : DbContext
{
    public DbSet<Recording>? Recordings { get; set; }
    public RecordingContext(DbContextOptions<RecordingContext> options) : base(options)
    {
    }
}

The context class you created above refers to an entity class called Recording which you will use to save the recording metadata. Next, create a new file under the Data directory called Recording.cs and update it as shown below:

namespace VoicemailDirectory.WebApi.Data;
public class Recording
{
    public int Id { get; set; }
    public string RecordingSID { get; set; }
    public DateTime Date { get; set; }
    public TimeSpan Duration { get; set; }
    public string CallerNumber { get; set; }
    public string Transcription { get; set; }
    public RecordingStatus Status { get; set; }
}
public enum RecordingStatus
{
    New,
    Saved
}

SQLite is a file-based SQL database engine. EF Core is going to create the database for you, as you will see later, but first, you have to specify the path for the database file.

Open Program.cs file and add the highlighted lines as shown below:

```csharp hl_lines=”3 4 5 6” builder.Services.AddControllers(); var folder = Environment.SpecialFolder.LocalApplicationData; var path = Environment.GetFolderPath(folder); var dbPath = Path.Join(path, “recordings.db”); builder.Services.AddDbContext(options => options.UseSqlite($"Data Source={dbPath}")); // Learn more about configuring Swagger/OpenAPI at https://aka.ms/aspnetcore/swashbuckle builder.Services.AddEndpointsApiExplorer();


Also, add the using statements at the top:

```csharp
using Microsoft.EntityFrameworkCore;
using VoicemailDirectory.WebApi.Data;

You can use any path or file name you like. The above example uses the local data path and uses “recordings.db” as the filename.

You can now inject the RecordingContext class wherever you want to carry out database operations. Alternatively, you can create a separate class to encapsulate all the database operations. This way your business logic doesn’t become tied to the implementation. To achieve this, create an interface under the Data directory called IRecordingRepository.cs with the following code:

namespace VoicemailDirectory.WebApi.Data;
public interface IRecordingRepository
{
    Task NewRecording(Recording recording);
    Task UpdateCallerAndTranscription(string recordingSID, string caller, string transcriptionText);
    Task ChangeStatusToSaved(string recordingSID);
    Task Delete(string recordingSID);
    List<Recording> GetAll();
}

This interface defines all the database operations you will need:

  • NewRecording: Creates and inserts a new Recording object when a new message comes in.

  • UpdateCallerAndTranscription: It takes a while to get the transcription, and it’s handled in a different endpoint. When Twilio calls your endpoint with the transcript info, this method is called to update the record. It also updates the caller number as it’s not present in the recording status callback.

  • ChangeStatusToSaved: Updates the status column to Saved for the specified recording.

  • Delete: Removes the recording metadata from the database.

  • GetAll: Returns all recordings in the database.

To implement this interface, create a new class called RecordingRepository under the Data directory:

using VoicemailDirectory.WebApi.Data;
public class RecordingRepository : IRecordingRepository
{
    private readonly RecordingContext _recordingContext;
    public RecordingRepository(RecordingContext recordingContext)
    {
        _recordingContext = recordingContext;
    }
    public async Task NewRecording(Recording recording)
    {
        await _recordingContext.Recordings.AddAsync(recording);
        await _recordingContext.SaveChangesAsync();
    }
    public async Task UpdateCallerAndTranscription(string recordingSID, string caller, string transcriptionText)
    {
        var recording = _recordingContext.Recordings.Single(rec => rec.RecordingSID == recordingSID);
        recording.CallerNumber = caller;
        recording.Transcription = transcriptionText;
        await _recordingContext.SaveChangesAsync();
    }
    public async Task ChangeStatusToSaved(string recordingSID)
    {
        var recording = _recordingContext.Recordings.Single(rec => rec.RecordingSID == recordingSID);
        recording.Status = RecordingStatus.Saved;
        await _recordingContext.SaveChangesAsync();
    }
    public async Task Delete(string recordingSID)
    {
        var recording = _recordingContext.Recordings.Single(rec => rec.RecordingSID == recordingSID);
        _recordingContext.Recordings.Remove(recording);
        await _recordingContext.SaveChangesAsync();
    }
    public List<Recording> GetAll()
    {
        return _recordingContext.Recordings.ToList();
    }
}

The repository class encapsulates RecordingContext and carries out the DB operations via EF Core.

You also have to register it to the IoC container by updating Program.cs as shown below:

```csharp hl_lines=”2” builder.Services.AddTransient(); builder.Services.AddTransient<IRecordingRepository, RecordingRepository>(); builder.Services.Configure(builder.Configuration.GetSection("Voicemail"));


Finally, it's time to create the database. Run the following commands to scaffold the migrations and create the database:

```bash
dotnet tool install --global dotnet-ef
dotnet add package Microsoft.EntityFrameworkCore.Design
dotnet ef migrations add InitialCreate
dotnet ef database update

You should now see a directory inside your project called Migrations and the recordings.db file in your local data path.

Build a Voicemail Inbox using Twilio Voice and Blazor (Part 2) - image 1

Refactor Controllers and Services

Now that you have a database layer, it’s time to refactor the controllers to make use of it.

Open RecordController.cs under the Controllers directory and set up IRecordingRepository as shown below:

```csharp hl_lines=”3 8 13” private readonly ILogger _logger; private readonly FileService _fileService; private readonly IRecordingRepository _recordingRepository; public RecordController( ILogger logger, FileService fileService, IRecordingRepository recordingRepository ) { _logger = logger; _fileService = fileService; _recordingRepository = recordingRepository; }


Also add this required using statement:

```csharp
using VoicemailDirectory.WebApi.Data;

Replace the RecordingStatus action with the code below:

   [HttpPost]
    public async Task RecordingStatus(
        [FromForm] string callSid,
        [FromForm] string recordingUrl,
        [FromForm] string recordingSid,
        [FromForm] string recordingStatus,
        [FromForm] string recordingStartTime,
        [FromForm] string recordingDuration
    )
    {
        _logger.LogInformation(
            "Recording status changed to {recordingStatus} for call {callSid}. Recording is available at {recordingUrl}",
            recordingStatus, callSid, recordingUrl
        );
        if (recordingStatus == "completed")
        {
            await _recordingRepository.NewRecording(new Recording
            {
                RecordingSID = recordingSid,
                Status = Data.RecordingStatus.New,
                Date = DateTime.Parse(recordingStartTime),
                Duration = TimeSpan.FromSeconds(double.Parse(recordingDuration)),
                CallerNumber = string.Empty,
                Transcription = string.Empty
            });
            await _fileService.DownloadRecording(recordingUrl, recordingSid);
        }
    }

The previous version only downloaded the file. Now, in addition to that, you also insert the metadata into the database.

Another change in the controller needs to be done in the Index method. You will instruct Twilio to transcribe the call and send you the transcription by updating the Record call as below:

```csharp hl_lines=”7 8” response.Record( timeout: 10, action: new Uri(Url.Action(“Bye”)!, UriKind.Relative), method: Twilio.Http.HttpMethod.Post, recordingStatusCallback: new Uri(Url.Action(“RecordingStatus”)!, UriKind.Relative), recordingStatusCallbackMethod: Twilio.Http.HttpMethod.Post, transcribe: true, transcribeCallback: new Uri(Url.Action(“TranscribeCallback”)!, UriKind.Relative) );


And add the method to handle the transcription callback:

```csharp
[HttpPost]
public async Task TranscribeCallback(
    [FromForm] string recordingSid,
    [FromForm] string transcriptionText,
    [FromForm] string from
)
{
    _logger.LogInformation(
        "Updating the recording {recordingSid} from {from} with transcription: {transcriptionText}",
        recordingSid, from, transcriptionText
    );
    await _recordingRepository.UpdateCallerAndTranscription(recordingSid, from, transcriptionText);
}

Update your settings and remove your phone from the owner list to test recording a new message again. Repeat the previous test. This time, you should also see a new record in the recordings.db database.

!!!info

If you don’t have an application to manage SQLite databases already installed, you can download DB Browser for SQLite for free.

!!!

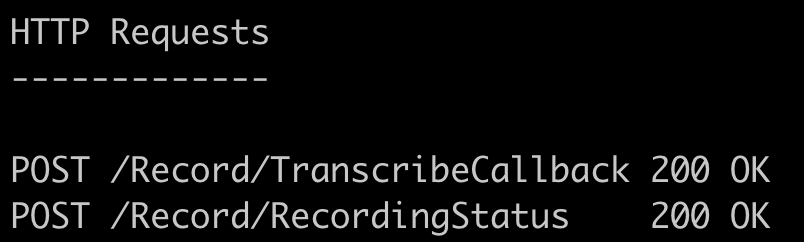
After you’ve saved your message, you should see a new call to your API:
Build a Voicemail Inbox using Twilio Voice and Blazor (Part 2) - image 2

The record is first inserted in the /Record/RecordingStatus endpoint. Then updated with the caller number and the call transcription in the /Record/TranscribeCallback endpoint.

Your recording row should look something like this in your database:
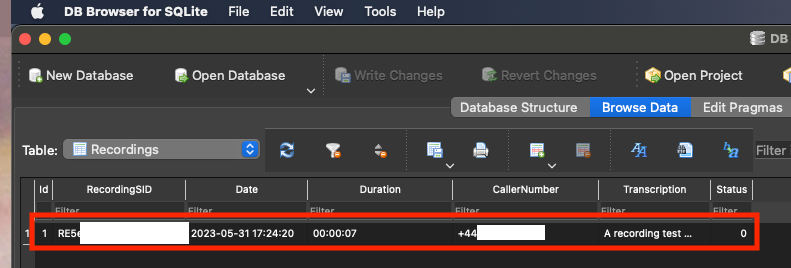
Build a Voicemail Inbox using Twilio Voice and Blazor (Part 2) - image 3

Next step is refactoring the DirectoryController class to use the database. Like RecordController, you need to inject the repository to handle the database operations.

Open DirectoryController.cs and set up IRecordingRepository as shown below:

```csharp hl_lines=”3 8 13” private readonly ILogger _logger; private readonly FileService _fileService; private readonly IRecordingRepository _recordingRepository; public DirectoryController( ILogger logger, FileService fileService, IRecordingRepository recordingRepository ) { _logger = logger; _fileService = fileService; _recordingRepository = recordingRepository; }


Then, add the required using statement:

```csharp
using VoicemailDirectory.WebApi.Data;

Current version gets the recordings from the FileService. In this version, you will get that data from the database.

Update the first 3 lines of the Index method as shown below:

var allRecordings = _recordingRepository.GetAll();
var newMessages = allRecordings.Where(rec => rec.Status == RecordingStatus.New).ToList();
var savedMessages = allRecordings.Where(rec => rec.Status == RecordingStatus.Saved).ToList();

Another change in this method is at the bottom, where you filter the recordings. Again, you will now use the RecordingRepository instead of the FileService. Replace the var allMessages = _fileService.GetRecordingSids; call with the code below:

var allMessages = allRecordings
    .OrderBy(rec => rec.Status) // So the new ones come on top
    .ThenByDescending(rec => rec.Date) // Descending so that the newest ones come on top
    .Select(rec => rec.RecordingSID)
    .ToList();

Final modification in this controller will be in the Gather method. Update the actions as shown below:

case 2: // Save
    await _recordingRepository.ChangeStatusToSaved(currentMessage);
    queuedMessages.Remove(currentMessage);
    break;
case 3: // Delete
    _fileService.DeleteRecording(currentMessage);
    await _recordingRepository.Delete(currentMessage);
    queuedMessages.Remove(currentMessage);
    break;

This way, in addition to managing the actual MP3 files, you keep the database accurate.

For this update to work, you have to convert the Gather method to async by making the following change in the method signature:

```csharp hl_lines=”1” public async Task Gather( [FromQuery] List queuedMessages, [FromForm] int digits )


Due to all these changes, the functionality of the `FileService` has also changed. You don't have to prefix the file name with its status anymore. Therefore, you don't need a save method. Update the current service with the simplified version as shown below:

```csharp
namespace VoicemailDirectory.WebApi.Services;
public class FileService
{
    private readonly HttpClient _httpClient;
    private readonly string _rootVoicemailPath;
    public FileService(IHttpClientFactory httpClientFactory, IWebHostEnvironment webHostEnvironment)
    {
        _rootVoicemailPath = $"{webHostEnvironment.WebRootPath}/Voicemails";
        _httpClient = httpClientFactory.CreateClient();
    }
    public async Task DownloadRecording(string recordingUrl, string recordingSid)
    {
        using HttpResponseMessage response = await _httpClient.GetAsync($"{recordingUrl}.mp3");
        response.EnsureSuccessStatusCode();
        await using var fs = new FileStream(
            $"{_rootVoicemailPath}/{recordingSid}.mp3",
            FileMode.CreateNew
        );
        await response.Content.CopyToAsync(fs);
    }
    public void DeleteRecording(string recordingSid) => File.Delete(GetRecordingPathBySid(recordingSid));
    private string GetRecordingPathBySid(string recordingSid)
        => Directory.GetFiles($"{_rootVoicemailPath}/", "*.mp3")
            .Single(s => s.Contains(recordingSid));
}

Leave another message for yourself and test the existing functionality by adding your number to the owner list and calling back. Once you’ve confirmed everything is still working as expected, move on to the next section to implement a new controller for your future front-end.

Implement the new controller

Currently, you have a voice-based user interface where you’re prompted with options when you call your own number. The GUI you will implement will need to have a new API endpoint that it can talk to. To achieve this, create a new controller under the Controllers directory called RecordingManagementController and update its code as shown below:

using Microsoft.AspNetCore.Mvc;
using VoicemailDirectory.WebApi.Data;
using VoicemailDirectory.WebApi.Services;
namespace VoicemailDirectory.WebApi.Controllers;
[ApiController]
[Route("[controller]/[action]")]
public class RecordingManagementController : ControllerBase
{
    private readonly FileService _fileService;
    private readonly IRecordingRepository _recordingRepository;
    public RecordingManagementController(IRecordingRepository recordingRepository, FileService fileService)
    {
        _recordingRepository = recordingRepository;
        _fileService = fileService;
    }
    [HttpGet]
    public ActionResult Index()
    {
        var recordings = _recordingRepository.GetAll();
        return Ok(recordings.OrderByDescending(m => m.Date));
    }
    [HttpPatch("{recordingSid}")]
    public async Task<ActionResult> Save(string recordingSid)
    {
        await _recordingRepository.ChangeStatusToSaved(recordingSid);
        return NoContent();
    }
    [HttpDelete("{recordingSid}")]
    public async Task<ActionResult> Delete(string recordingSid)
    {
        await _recordingRepository.Delete(recordingSid);
        _fileService.DeleteRecording(recordingSid);
        return NoContent();
    }
}

As you can see, the goal here is to have the same functionality via the GUI.

Now that you have your API ready for the front-end, proceed to implement it.

Implement the front-end

In the terminal, navigate to the solution level and run the following command:

dotnet new blazorwasm -o VoicemailDirectory.Console
dotnet sln add ./VoicemailDirectory.Console/VoicemailDirectory.Console.csproj

This should create a new Blazor WebAssembly project and add it to your solution.

The Blazor application sets up and HTTP client to resolve HTTP requests to its own app URL, but you’ll need to make HTTP requests to the API project running on a separate URL. The web API runs on http://localhost:5096, so update your VoicemailDirectory.Console/Program.cs as shown below to reflect this:

```csharp hl_lines=”3” builder.RootComponents.Add("head::after"); builder.Services.AddScoped(sp => new HttpClient { BaseAddress = new Uri("http://localhost:5096") }); await builder.Build().RunAsync();


To get rid of the default navigation and sample pages, update the MainLayout.razor as shown below:

```csharp
@inherits LayoutComponentBase
<div class="page">
    <main>
        <article class="content px-4">
            @Body
        </article>
    </main>
</div>

Also remove the following files to keep things clean:

  • Shared/SurveyPrompt.razor

  • Shared/NavMenu.razor

  • Shared/NavMenu.razor.cs

  • Pages/Counter.razor

  • Pages/FetchData.razor

Replace the contents of Index.razor with the code below:

@page "/"
@inject HttpClient Http
<PageTitle>Voicemail Management Console</PageTitle>
<h1>Voicemail Management Console</h1>
@if (recordingMetadata == null)
{
    <p>No recording found.</p>
}
else
{
    <table class="table">
        <thead>
            <tr>
                <th>Date</th>
                <th>Caller</th>
                <th>Duration</th>
                <th>Transcription</th>
                <th>Status</th>
                <th>Recording</th>
                <th>Actions</th>
            </tr>
        </thead>
        <tbody>
            @foreach (var recording in recordingMetadata)
            {
                <tr>
                    <td>@recording.Date.ToShortDateString() @recording.Date.ToShortTimeString()</td>
                    <td>@recording.CallerNumber</td>
                    <td>@recording.Duration</td>
                    <td>@recording.Transcription</td>
                    <td>@recording.Status</td>
                    <td>
                        <audio controls>
                            <source src=@($"{Http.BaseAddress}/Voicemails/{recording.RecordingSID}.mp3") type="audio/mpeg">
                        </audio>
                    </td>
                    <td>
                        <button type="button" class="btn btn-primary" @onclick="() => SaveRecording(recording.RecordingSID)">Save</button>
                        <button type="button" class="btn btn-danger" @onclick="() => DeleteRecording(recording.RecordingSID)">Delete</button>
                    </td>
                </tr>
            }
        </tbody>
    </table>
}
@code {
    private Recording[]? recordingMetadata;
    protected override async Task OnInitializedAsync() => await UpdateTable();
    private async Task SaveRecording(string recordingSid)
    {
        await Http.PatchAsync($"/RecordingManagement/Save/{recordingSid}", null);
        await UpdateTable();
    }
    private async Task DeleteRecording(string recordingSid)
    {
        await Http.DeleteAsync($"/RecordingManagement/Delete/{recordingSid}");
        await UpdateTable();
    }
    private async Task UpdateTable() => recordingMetadata = await Http.GetFromJsonAsync<Recording[]>("/RecordingManagement/Index");
}

This page calls the newly created API endpoints to get the list of Recording objects and save/delete operations.

Create a new class called Recording inside the Blazor project as well, and paste the same code as the API:

namespace VoicemailDirectory.Console;
public class Recording
{
    public int Id { get; set; }
    public string RecordingSID { get; set; }
    public DateTime Date { get; set; }
    public TimeSpan Duration { get; set; }
    public string CallerNumber { get; set; }
    public string Transcription { get; set; }
    public RecordingStatus Status { get; set; }
}
public enum RecordingStatus
{
    New,
    Saved
}

!!!info

Instead of duplicating the code this way, you can create a class library with the data classes and share between the API and the Blazor app. This tutorial creates a copy of the recording class to keep things simple.

!!!

For this setup to work, you also need to update the CORS policy of your API. Even though both applications run locally, they run on different ports and thus on different origins. For security reasons, browsers don’t allow one origin to send HTTP requests to other origins. You can provide Cross-Origin Resource Sharing (CORS) headers from your API project to tell the browser which origins are allowed to send HTTP requests to the API project. So in order for Blazor to call the API, you need to enable a permissive CORS policy in the API project.

!!!info

Sometimes in development environments, and especially in production, a reverse proxy is used to host the front-end and the back-end on a single origin, thus avoiding the need for CORS. Here’s a tutorial that shows you how to host a client and API on a single origin using YARP, Microsoft’s ASP.NET Core based reverse proxy.

!!!

Open the Program.cs file in the API project and the highlighted lines as shown below:

```csharp hl_lines=”3 4 5 6 7 8 9” builder.Services.AddDbContext(options => options.UseSqlite($"Data Source={dbPath}")); builder.Services.AddCors(policy => { policy.AddPolicy("CorsPolicy", opt => opt .AllowAnyOrigin() .AllowAnyHeader() .AllowAnyMethod()); }); // Learn more about configuring Swagger/OpenAPI at https://aka.ms/aspnetcore/swashbuckle builder.Services.AddEndpointsApiExplorer();


!!!warning

Do not allow any origin (`AllowAnyOrigin()`) in production. Instead, explicitly configure the individual origins you'd like to allow.

!!!

And the following line to enable the policy:

```csharp hl_lines="3"
app.MapControllers();
app.UseCors("CorsPolicy");
app.Run();

Then, restart your API for your changes to take effect.

So the final step is to run the front-end test the functionality using the Blazor WebAssembly front-end.

Test via the front-end

While your API is still running, open another terminal inside the console application and run it with the following command:

dotnet run

Open a browser and go to your application at http://localhost:{YOUR APPLICATION’S PORT}.

It should look like this:
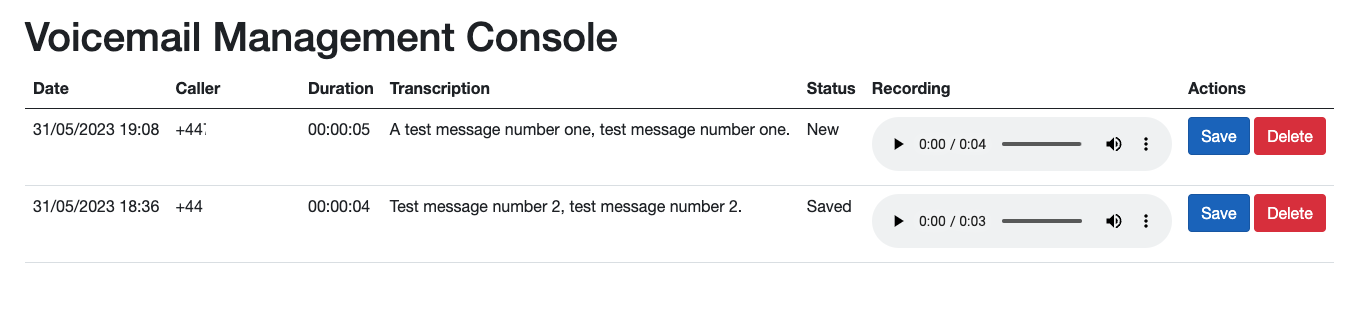
Build a Voicemail Inbox using Twilio Voice and Blazor (Part 2) - image 4

If you have lots of messages, you can play them very quickly as the play button for all of them will be directly accessible to you, whereas if you tried to achieve the same via the voice UI, you would have to go through all the messages one-by-one. Also, you can see the transcriptions, so you may not even want to play the messages in the first place.

Conclusion

In this tutorial, you implemented using a SQLite database with EF Core, and also implemented your Blazor WebAssembly front-end to add more functionality to your voicemail service. I hope you enjoyed following this tutorial as much as I enjoyed writing it.

If you’d like to keep learning, I recommend taking a look at these articles:

dev voice, voicemail, aspnetcore, dotnet, twilio

This article was originally published on the Twilio Blog.

Most mobile networks provide a voicemail service letting people who call you leave a message when you can’t answer, and letting you listen to those messages by calling your voicemail number. When you have programmatic access to your calls using Twilio, you can implement your voicemail service and customize it to you or your business’s needs.

In this tutorial, you will learn how to implement an Interactive Voice Response (IVR) app using ASP.NET Core Web API project to record and serve your voicemails and how to manage them (play/save/delete) by calling your Twilio phone number.

Prerequisites

You’ll need the following things in this tutorial:

Project overview

In this tutorial, you will implement an ASP.NET Core Web API to record and manage your voicemails. Before getting into the implementation details, let’s take a look at what it does:

The flow of your IVR starts when someone calls your Twilio phone number which Twilio picks up. Twilio passes the call details to your Web API and expects TwiML instructions to manage the call. If the caller’s phone number is one of the “owners” phone numbers, the voicemail directory flow will be invoked, otherwise the voicemail recording flow will be invoked.

Voicemail recording flow:

  • The IVR asks the caller to leave a message after the beep, after which the call is being recorded.

  • Once the caller finishes recording, the IVR thanks the caller for leaving a message and ends the call.

  • When Twilio saves the recording, Twilio will notify your Web API of the location of the recording and your Web API downloads the recording to disk.

Voicemail directory flow:

  • The IVR informs the user how many new and saved messages are available, and creates a queue of the messages

  • The IVR plays the current message in the queue and asks to press the dial pad buttons to either 1-replay, 2-save, or 3-delete the message.

  • If 1 is pressed, the message and the queue are not changed. If 2 is pressed, the message is saved, and then the message is removed from the queue. If 3 is pressed, the message is deleted, and then the message removed from the queue. If there are more messages in the queue, go to step 7.

  • The IVR informs the caller that there are no more messages and ends the call.

Now that you are more familiar with the end result, let’s get started.

Project set up

The easiest way to set up the starter project is by cloning the sample GitHub repository.

Open a terminal, change to the directory you want to download the project and run the following command:

git clone https://github.com/Dev-Power/voicemail-service-using-twilio.git --branch starter-project

The project can be found in the src\VoicemailDirectory.WebApi subfolder. Open the project in your IDE.

The project comes with empty files that you will implement as you go along. Before starting the implementation, let’s take a look at the key points in the starter project:

The API will download the audio recordings and store them under the wwwroot/Voicemails directory. To let Twilio have access to these files, static file hosting is enabled in the API by adding the following line to the Program.cs file:

app.UseStaticFiles();

!!!warning

The voicemail recordings will be stored on your web server and served as static files, meaning that anyone would be able to download them. In production, you should validate that the incoming HTTP requests, requesting these static files originate from Twilio, and not someone else. Follow the documentation for the Twilio helper library for ASP.NET on how to validate Twilio requests for static files and your webhooks.

!!!

The downloading operation and all local I/O operations will be handled via FileService, which is added to the IoC by the following statements in Program.cs:

builder.Services.AddHttpClient();
builder.Services.AddTransient<FileService>();

As explained in the project overview section, you must add the owner’s phones to the configuration to access your voicemails. You can only listen to your voicemails by calling from one of those numbers.

Update your configuration by adding your phone number(s) to the appsettings.json file:

 "Voicemail": {
    "Owners": [
      "{ YOUR PHONE NUMBER }"
    ]
  }

Next, for Twilio to be able to send HTTP requests to your Web API, you’ll need to make your locally running Web API publicly available over the internet. You can use ngrok for this, a free secure tunneling service. Run the following command to create a tunnel with ngrok:

ngrok http http://localhost:5096

!!!info

http://localhost:5096 is the local URL that your Web API will listen to for HTTP requests.

!!!

Note the forwarding URL on your screen, which should look like this:

Forwarding                    https://{random-url}.{region}.ngrok.io -> http://localhost:5096

Ngrok has now created a secure tunnel that will accept HTTP requests at the temporary Forwarding URL and forward those requests to http://localhost:5096.

When your Twilio phone number receives a phone call, Twilio will send an HTTP request to your Web API passing in the call information and expecting instructions. You need to configure where this HTTP request is sent when a call comes in.

To do this, go to the Twilio Console, select your account, and then click Phone Numbers → Manage → Active Numbers on the left pane. (If Phone Numbers isn’t on the left pane, click on Explore Products and then on Phone Numbers.)

Click on the phone number you want to use for your project and scroll down to the Voice section.

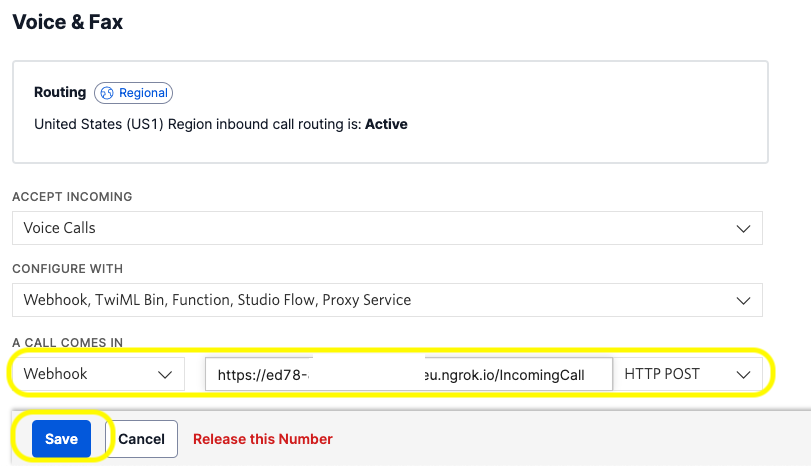
Under the A Call Comes In label, set the dropdown to Webhook, the text field next to it to the ngrok Forwarding URL suffixed with the /IncomingCall path, the next dropdown to HTTP POST, and click Save. It should look like this:

Build a Voicemail Inbox using Twilio Voice and ASP.NET Core - image 1

Note that you have to use HTTPS as the protocol when setting the webhook URL.

Now that all the plumbing is done, move on to the next section to implement the application.

Project implementation

The first step to recording voicemails is to receive the calls. As you added the /IncomingCall path to your webhook URL, your controller must match this.

Update the IncomingCallController.cs file with the following code:

using Microsoft.AspNetCore.Mvc;
using Microsoft.Extensions.Options;
using Twilio.AspNet.Core;
using Twilio.TwiML;
namespace VoicemailDirectory.WebApi.Controllers;
[ApiController]
[Route("[controller]")]
public class IncomingCallController : TwilioController
{
    private readonly VoicemailOptions _voicemailOptions;
    public IncomingCallController(IOptionsSnapshot<VoicemailOptions> voicemailOptions)
    {
        _voicemailOptions = voicemailOptions.Value;
    }
    [HttpPost]
    public TwiMLResult Index([FromForm] string from)
    {
        var response = new VoiceResponse();
        var redirectUrl = _voicemailOptions.Owners.Contains(from)
            ? Url.Action("Index", "Directory")!
            : Url.Action("Index", "Record")!;
        response.Redirect(
            url: new Uri(redirectUrl, UriKind.Relative),
            method: Twilio.Http.HttpMethod.Post
        );
        return TwiML(response);
    }
}

The default action (Index) is invoked when somebody calls your Twilio phone number. The calling number is checked here to see if the caller is an owner or anybody else. If the caller is unknown, it redirects to the RecordController’s Index action. If the caller is an owner, it redirects to the DirectoryController’s Index action.

!!!info

Using IOptionsSnapshot allows you to update the phone numbers configured in appsettings.json in the Voicemail:Owners array without having to stop the application. This is especially useful when testing because you can quickly change the mode of operation by updating the configuration.

!!!

Update the RecordController.cs with the following code:

using Microsoft.AspNetCore.Mvc;
using Twilio.AspNet.Core;
using Twilio.TwiML;
using VoicemailDirectory.WebApi.Services;
namespace VoicemailDirectory.WebApi.Controllers;
[ApiController]
[Route("[controller]/[action]")]
public class RecordController : TwilioController
{
    private readonly ILogger<IncomingCallController> _logger;
    private readonly FileService _fileService;
    public RecordController(
        ILogger<IncomingCallController> logger,
        FileService fileService
    )
    {
        _logger = logger;
        _fileService = fileService;
    }
    [HttpPost]
    public TwiMLResult Index()
    {
        var response = new VoiceResponse();
        response.Say("Hello, please leave a message after the beep.");
        response.Record(
            timeout: 10,
            action: new Uri(Url.Action("Bye")!, UriKind.Relative),
            method: Twilio.Http.HttpMethod.Post,
            recordingStatusCallback: new Uri(Url.Action("RecordingStatus")!, UriKind.Relative),
            recordingStatusCallbackMethod: Twilio.Http.HttpMethod.Post
        );
        return TwiML(response);
    }
    [HttpPost]
    public TwiMLResult Bye() => new VoiceResponse()
        .Say("Thank you for leaving a message, goodbye.")
        .ToTwiMLResult();
    [HttpPost]
    public async Task RecordingStatus(
        [FromForm] string callSid,
        [FromForm] string recordingUrl,
        [FromForm] string recordingSid,
        [FromForm] string recordingStatus
    )
    {
        _logger.LogInformation(
            "Recording status changed to {recordingStatus} for call {callSid}. Recording is available at {recordingUrl}",
            recordingStatus, callSid, recordingUrl
        );
        if (recordingStatus == "completed")
        {
            await _fileService.DownloadRecording(recordingUrl, recordingSid);
        }
    }
}

Recording the voicemails is a 3-step process:

  • Respond with TwiML instruction to tell Twilio to record the call, which is done in the Index action.

  • When the caller is done recording, Twilio will send an HTTP request to the Bye action, because that’s the action URL configured on the Record TwiML. The Bye action will acknowledge the message has been taken to the caller, and because there’s no further TwiML instructions, the call will be ended.

  • When the recording status changes, Twilio will send an HTTP request to the RecordingStatus action, because that’s the recordingStatusCallback URL configured on the Record TwiML. The HTTP request sent to the RecordingStatus action will contain data such as the recording URL, SID, status, and more. If the status is completed, the action will download the audio recording and store it locally.

The caller may hang up before reaching the timeout, in which case they will not hear the acknowledgement message, but the recording will still be downloaded.

!!!warning

By default, Recording URLs don’t require authentication, and recordings are not encrypted. However, you can require basic authentication to access the recordings and configure recordings to be encrypted in the voice settings (Voice → Settings → General). If you enable basic authentication, you’ll need to provide the Twilio Account SID and Auth Token, or API Key SID and API Key Secret as the username and password. This tutorial assumes basic authentication is not enabled for recordings.

!!!

Next, update the third and final controller, DirectoryController, with the following code:

using Microsoft.AspNetCore.Mvc;
using Twilio.AspNet.Core;
using Twilio.TwiML;
using Twilio.TwiML.Voice;
using VoicemailDirectory.WebApi.Services;
namespace VoicemailDirectory.WebApi.Controllers;
[ApiController]
[Route("[controller]/[action]")]
public class DirectoryController : TwilioController
{
    private readonly ILogger<DirectoryController> _logger;
    private readonly FileService _fileService;
    public DirectoryController(
        ILogger<DirectoryController> logger,
        FileService fileService
    )
    {
        _logger = logger;
        _fileService = fileService;
    }
    [HttpPost]
    public TwiMLResult Index()
    {
        var newMessages = _fileService.GetRecordingSids(Constants.New);
        var savedMessages = _fileService.GetRecordingSids(Constants.Saved);
        var response = new VoiceResponse();
        string GetWordingSingularOrPlural(int messageCount) => messageCount == 1 ? "message" : "messages";
        string GetNumberOrNo(int messageCount) => messageCount == 0 ? "no" : messageCount.ToString();
        response.Say(
            $"Hello, you have {GetNumberOrNo(newMessages.Count)} new {GetWordingSingularOrPlural(newMessages.Count)} " +
            $"and {GetNumberOrNo(savedMessages.Count)} saved {GetWordingSingularOrPlural(savedMessages.Count)}. "
        );
        // If there are no new or saved messages, end the call
        if (newMessages.Count == 0 && savedMessages.Count == 0)
        {
            response.Say("Goodbye!");
            return TwiML(response);
        }
        // Start with the new messages if there are any
        string recordingType = newMessages.Count > 0 ? Constants.New : Constants.Saved;
        response.Say($"Playing {recordingType} messages.");
        // No filter to get all recordings. Order alphabetically so that the new ones come at top
        // Can prepend datetime as well to order more precisely
        var allMessages = _fileService.GetRecordingSids(string.Empty)
            .OrderBy(s => s)
            .ToList();
        response.Append(
            CreateGatherTwiml(allMessages)
                .Append(PlayNextMessage(allMessages))
                .Append(SayOptions())
        );
        return TwiML(response);
    }
    [HttpPost]
    public TwiMLResult Gather(
        [FromQuery] List<string> queuedMessages,
        [FromForm] int digits
    )
    {
        _logger.LogInformation(
            "QueuedMessages: {queuedMessages}, user entered: {digits}",
            queuedMessages, digits
        );
        var currentMessage = queuedMessages.First();
        var isCurrentMessageNew = currentMessage.StartsWith(Constants.New);
        var response = new VoiceResponse();
        switch (digits)
        {
            case 1: // Replay
                // No action. The existing message will stay at the top of the queue to be replayed
                break;
            case 2: // Save
                _fileService.SaveRecording(currentMessage);
                queuedMessages.Remove(currentMessage);
                break;
            case 3: // Delete
                _fileService.DeleteRecording(currentMessage);
                queuedMessages.Remove(currentMessage);
                break;
            default: // Invalid key. Play error message then say the valid options again.
                response.Say("Sorry, that key is not valid.");
                response.Append(
                    CreateGatherTwiml(queuedMessages)
                        .Append(SayOptions())
                );
                return TwiML(response);
        }
        if (queuedMessages.Count == 0)
        {
            response.Say("No more messages. Goodbye!");
            return TwiML(response);
        }
        if (isCurrentMessageNew && queuedMessages.First().StartsWith(Constants.Saved))
        {
            response.Say("No more new messages. Here are your saved messages.");
        }
        response.Append(
            CreateGatherTwiml(queuedMessages)
                .Append(PlayNextMessage(queuedMessages))
                .Append(SayOptions())
        );
        return TwiML(response);
    }
    private Gather CreateGatherTwiml(List<string> queuedMessages) => new Gather(
        input: new List<Gather.InputEnum> {Twilio.TwiML.Voice.Gather.InputEnum.Dtmf},
        timeout: 5,
        numDigits: 1,
        action: new Uri(
            Url.Action("Gather", new {queuedMessages})!,
            UriKind.Relative
        ),
        method: Twilio.Http.HttpMethod.Post
    );
    private Say SayOptions()
        => new Say("To replay press 1. To save the message press 2. To delete the message press 3.");
    private Play PlayNextMessage(List<string> queuedMessages)
    {
        var nextMessage = queuedMessages.First();
        return new Play(new Uri($"/Voicemails/{nextMessage}.mp3", UriKind.Relative));
    }
}

The response comprises three TwiML verbs:

  • Gather: Used to collect caller input which the caller provides by pressing a button in their dial keypad (DTMF)

  • Play: Used to play audio recordings to the caller

  • Say: Used to communicate the actions they can take after listening to the recordings.

!!!info

The queued messages are passed in the query string, so the number of voicemails the system supports is limited by the maximum length of a URL (which is around 2,000 characters). You may bump into issues after approximately 40 - 50 messages if you never delete them. If this is an issue you could store this in cookies, in session, or in some other data store.

!!!

When you call your Twilio phone number as the owner, the Index action will be executed. You haven’t implemented the FileService yet (which is next), but from the function names, you can deduce that this action does the following:

  • Get the new and saved recordings separately

  • Prepare a welcome message to indicate how many new and how many saved messages are in the directory

  • Get a list of all recordings and prepare the TwiML response to play the first message in the queue, followed by prompting the available options.

After the first message is played to the caller and the caller has made their decision, Twilio passes this information to the Gather action of the controller. Now you have to decide what to do based on the caller’s action, which is what the switch statement in the Gather action does.

Before going over the logic in this controller, implement the FileService as well, as the controller uses that service heavily.

Update the FileService.cs file with the following code:

namespace VoicemailDirectory.WebApi.Services;
public class FileService
{
    private readonly HttpClient _httpClient;
    private readonly string _rootVoicemailPath;
    public FileService(IHttpClientFactory httpClientFactory, IWebHostEnvironment webHostEnvironment)
    {
        _rootVoicemailPath = $"{webHostEnvironment.WebRootPath}/Voicemails";
        _httpClient = httpClientFactory.CreateClient();
    }
    public async Task DownloadRecording(string recordingUrl, string recordingSid)
    {
        using HttpResponseMessage response = await _httpClient.GetAsync($"{recordingUrl}.mp3");
        response.EnsureSuccessStatusCode();
        await using var fs = new FileStream(
            $"{_rootVoicemailPath}/{Constants.New}_{recordingSid}.mp3",
            FileMode.CreateNew
        );
        await response.Content.CopyToAsync(fs);
    }
    public List<string> GetRecordingSids(string recordingType)
        => Directory.GetFiles($"{_rootVoicemailPath}/", $"{recordingType}*.mp3")
            .Select(s => Path.GetFileNameWithoutExtension(s))
            .ToList();
    public void SaveRecording(string recordingSid)
    {
        var currentPath = GetRecordingPathBySid(recordingSid);
        var newPath = currentPath.Replace($"{Constants.New}", $"{Constants.Saved}");
        File.Move(currentPath, newPath);
    }
    public void DeleteRecording(string recordingSid) => File.Delete(GetRecordingPathBySid(recordingSid));
    private string GetRecordingPathBySid(string recordingSid)
        => Directory.GetFiles($"{_rootVoicemailPath}/", "*.mp3")
            .Single(s => s.Contains(recordingSid));
}

If the user has pressed 1 to replay the message, you don’t have to do anything in your API other than return the same response. As long as the message is left at the top of the queue, it will be played to the caller.

If the user has pressed 2 to save the message, the controller calls the SaveRecording method of the FileService, which renames the file by replacing “New” with “Saved”. This way, the next time you call your voicemail service, this recording will be treated as an old recording.

If the user has pressed 3 to delete the message, the controller calls the DeleteRecording method of the FileService, which deletes the file from the file system.

If the caller has pressed any other key, the action returns the TwiML to say that the key was invalid, replays the valid options, and listens for the next dialpad button to be pressed, so that they can correct their mistake.

Test the application

First, to test leaving a voicemail, remove your phone number from appsettings.json and run the application with the following command:

dotnet run

Call your Twilio phone number. You should be greeted with “Hello, please leave a message after the beep.”. Leave your message. After a few seconds, you should see a new MP3 file saved under wwwroot/Voicemails directory prefixed with “New_” indicating that it has not been played to the user before (at least not saved by the user, so it’s treated as a new message).

Update the appsettings.json by adding your number in the owner’s list and call your Twilio phone number again.

This time you should be greeted with a message telling you have 1 new message and no saved messages, followed by the recorded message. You can then take action and choose what to do with the messages.

Conclusion

When determining the scope and business logic of this voicemail service, I used my own phone provider as a guide. I was able to add all the features that they provide, so by implementing this project you created yourself a voicemail service that actually matches the features of a real voicemail service. You can deploy this to a cloud provider and give your Twilio number to receive voicemails when you don’t want to distribute your own phone number.

Apart from that, you learned how to deal with call recordings and user input. If you’d like to keep learning, I recommend taking a look at these articles: